 我的书签
我的书签
 添加书签
添加书签 移除书签
移除书签- BeagleBone Blue
- 操作系统映像
- 机器人控制库文件
- 设置机器人控制库
- 交叉编译器构建
- 交叉编译器设置
- 交叉编译和上传
- 本机构建(可选) {#native_builds}
- 引导期间自动启动
- 其它选项
- 动力伺服导轨
- 特殊功能
- SBUS 信号转换器
- 典型连接
- 其它选项
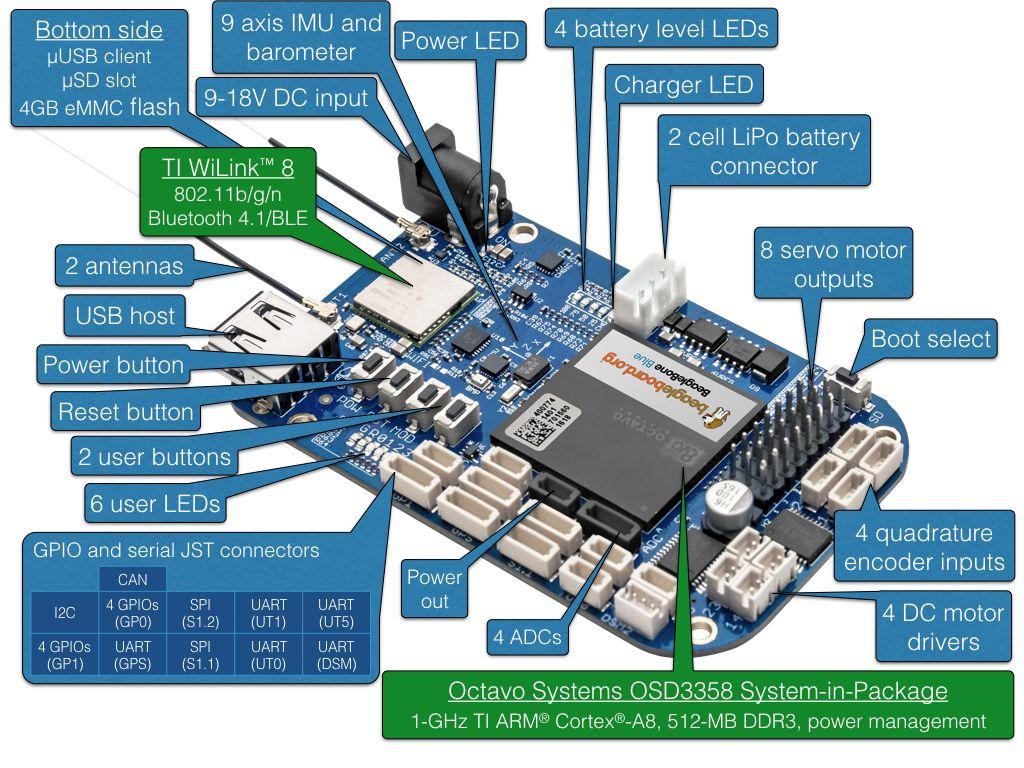
BeagleBone Blue
BeagleBone Blue 是一台基于 Linux 的一体机。 它针对机器人技术进行了优化,这种紧凑且便宜的电路板具有飞行控制器所需的所有必要传感器和外围设备。 本主题说明如何设置电路板以使用 librobotcontrol 机器人软件包运行 PX4。
操作系统映像
可以在这里找到 BeagleBone Blue 图像:
- 最新的稳定 OS 映像。
- 测试 OS 映像(经常更新)。
有关闪存操作系统映像的信息可以在 this page 上找到。 其他有用的信息可以在 FAQ 中找到。
机器人控制库文件
在 BeagleBone Blue 上,PX4 需要 librobotcontrol 版本 1.0.0 或更高版本。
BeagleBoard 操作系统映像预装了 librobotcontrol,但在所有操作系统映像中可能无法正常工作。
检查 librobotcontrol 是否正常工作的一种方法是运行 librobotcontrol 附带的 rc_test_drivers。 如以下示例所示,所有测试都应通过。 可选择运行其他测试,例如 rc_test_bmp,rc_test_mpu 等。
debian@beaglebone:~$ rc_test_driversKernel: 4.14.56-ti-rt-r64BeagleBoard.org Debian Image 2018-07-22Debian: 9.5PASSED: gpio 0PASSED: gpio 1PASSED: gpio 2PASSED: gpio 3PASSED: pwm1PASSED: pwm2PASSED: eqep0PASSED: eqep1PASSED: eqep2PASSED: pru-rprocPASSED: uart1PASSED: uart2PASSED: uart4PASSED: uart5PASSED: i2c1PASSED: i2c2PASSED: spiPASSED: LEDPASSED: ADC iioCurrently running on a:MODEL_BB_BLUERobot Control library Version:1.0.0
Tip您可以选择更新到实时内核,如果这样做,请重新检查 librobotcontrol 是否与实时内核一起正常工作。
The latest OS images at time of updating this document is bone-debian-9.5-iot-armhf-2018-10-07-4gb.img.xz.
设置机器人控制库
如果要构建 PX4,则此库还有其他设置步骤。
Here are steps to build the librobotcontrol with PX4 extensions natively on a BeagleBone board:
shgit clone https://github.com/StrawsonDesign/librobotcontrol.gitcd librobotcontrolmake EXT_CFLAGS=-DRC_AUTOPILOT_EXTsudo make install
Tip
EXT_CFLAGSwas added after version 1.0.4. If it’s not in your version of librobotcontrol/library/Makefile, add it toCLFAGS, e.g.,CFLAGS := $(EXT_CFLAGS) -g -fPIC -I $(INCLUDEDIR)
After acquiring the pre-built library,
- Select the librobotcontrol installation directory, and set it in the
LIBROBOTCONTROL_INSTALL_DIRenvironment variable so that other unwanted headers will not be included - Install robotcontrol.h and rc/* into
$LIBROBOTCONTROL_INSTALL_DIR/include - Install pre-built native (ARM) version of librobotcontrol.* into
$LIBROBOTCONTROL_INSTALL_DIR/lib
At this point the BeagleBone Blue target can be built on both cross compile host system and native build system, i.e.,
make posix_bbblue_cross [upload]
交叉编译器构建
The recommended way to build PX4 for BeagleBone Blue is to compile on a development computer and upload the PX4 executable binary directly to the BeagleBone Blue.
Tip This approach is recommended over native build due to speed of deployment and ease of use.
交叉编译器设置
ARM Cross Compiler for BeagleBone Blue can be found at Linaro Toolchain Binaries site. The following is an example setup on development host.
First install the toolchain into /opt/bbblue_toolchain/gcc-arm-linux-gnueabihf. Here is an example of using soft link to select which version of the toolchain you want to use:
...@ubuntu:/opt/bbblue_toolchain$ ls -llrwxrwxrwx 1 root root 51 Mar 22 16:10 gcc-arm-linux-gnueabihf -> gcc-linaro-6.3.1-2017.05-x86_64_arm-linux-gnueabihfdrwxr-xr-x 8 root root 4096 May 17 2017 gcc-linaro-6.3.1-2017.05-x86_64_arm-linux-gnueabihfdrwxr-xr-x 8 root root 4096 Nov 19 03:51 gcc-linaro-6.4.1-2017.11-x86_64_arm-linux-gnueabihf
Add it to the PATH in ~/.profile as shown below
export PATH=$PATH:/opt/bbblue_toolchain/gcc-arm-linux-gnueabihf/binexport CrossCompiler=/opt/bbblue_toolchain/gcc-arm-linux-gnueabihf/bin/arm-linux-gnueabihf-
Tip GCC in the toolchain should be compatible with kernel in BeagleBone Blue. General rule of thumb is to choose a toolchain where version of GCC is not higher than version of GCC which comes with the OS image on BeagleBone Blue.
交叉编译和上传
- First set up rsync (this is is used to transfer files from the development computer to the target board over a network - WiFi or Ethernet).
- For rsync over SSH with key authentication, follow steps similar to those for Raspberry Pi/Navio
- On the development computer, define the BeagleBone Blue board as
BBBluePX4in /etc/hosts
- Run the following command to build and upload files:
shmake posix_bbblue_cross upload
To test the uploaded files, run the following commands on the BeagleBone Blue board:
cd /home/debian/px4sudo ./bin/px4 -s px4.config
Note Currently librobotcontrol requires root access.
本机构建(可选) {#native_builds}
You can also natively build PX4 builds directly on the BeagleBone Blue.
Run the following commands on the BeagleBone Blue (i.e. via SSH):
Install dependencies:
shsudo apt-get updatesudo apt-get install cmake python-empy
Clone the PX4 Firmware directly onto the BeagleBone Blue.
- Continue with the standard build system installation.
引导期间自动启动
Here is an example [/etc/rc.local]:
#!/bin/sh -e## rc.local## This script is executed at the end of each multiuser runlevel.# Make sure that the script will "exit 0" on success or any other# value on error.## In order to enable or disable this script just change the execution# bits.## By default this script does nothing.# wait for services to start up/bin/sleep 25cd /home/debian/px4/home/debian/px4/bin/px4 -d -s /home/debian/px4/px4.config > /home/debian/px4/PX4.log &exit 0
Below is a systemd service example [/lib/systemd/system/px4-quad-copter.service]:
[Unit]Description=PX4 Quadcopter ServiceAfter=networking.service network-online.targetStartLimitIntervalSec=0Conflicts=px4-fixed-wing.service[Service]WorkingDirectory=/home/debian/px4User=rootExecStart=/home/debian/px4/bin/px4 -d -s /home/debian/px4/px4.configRestart=on-failureRestartSec=1[Install]WantedBy=multi-user.target
其它选项
动力伺服导轨
When PX4 starts, it automatically applies power to servos.
特殊功能
BeagleBone Blue has some unique features such as multiple choices of WiFi interfaces and power sources. Refer to comments in /home/debian/px4/px4.config for usage of these features.
SBUS 信号转换器
SBUS signal from receiver (e.g., FrSky X8R) is an inverted signal. UARTs on BeagleBone Blue can only work with non-inverted 3.3V level signal. This tutorial contains a SBUS signal inverter circuit.
典型连接
For a quadcopter with GPS and an SBUS receiver, here are typical connections:
Connect the ESC of motor 1, 2, 3 and 4 to channel 1, 2, 3 and 4 of servo outputs on BeagleBone Blue, respectively. If your ESC connector contains a power output pin, remove it and do not connect it to the power output pin of the servo channel on the BeagleBone Blue.
Connect the above mentioned converted SBUS signal to the dsm2 port if you have the matching connector for dsm2, otherwise connect it to any other available UART port and change the corresponding port in /home/debian/px4/px4.config accordingly.
Connect the signals of GPS module to GPS port on the BeagleBone Blue. Note that the signal pins of the GPS port on the BeagleBone Blue are only 3.3V tolerant, so choose your GPS module accordingly.
