 我的书签
我的书签
 添加书签
添加书签 移除书签
移除书签- Android部署
Android部署
现在开始在Android环境部署,对于国内的读者,因为获取SDK和gradle编译环境等资源,需要先给Android Studio配置proxy或者使用国内的镜像。
配置build.gradle
将 build.gradle 中的maven源 google() 和 jcenter() 分别替换为国内镜像,如下:
- buildscript {
- repositories {
- maven { url 'https://maven.aliyun.com/nexus/content/repositories/google' }
- maven { url 'https://maven.aliyun.com/nexus/content/repositories/jcenter' }
- }
- dependencies {
- classpath 'com.android.tools.build:gradle:3.5.1'
- }
- }
- allprojects {
- repositories {
- maven { url 'https://maven.aliyun.com/nexus/content/repositories/google' }
- maven { url 'https://maven.aliyun.com/nexus/content/repositories/jcenter' }
- }
- }
配置app/build.gradle
新建一个Android Project,打开 app/build.gradle 添加如下信息:
- android {
- aaptOptions {
- noCompress "tflite" // 编译apk时,不压缩tflite文件
- }
- }
- dependencies {
- implementation 'org.tensorflow:tensorflow-lite:1.14.0'
- }
其中,
aaptOptions设置tflite文件不压缩,确保后面tflite文件可以被Interpreter正确加载。org.tensorflow:tensorflow-lite的最新版本号可以在这里查询 https://bintray.com/google/tensorflow/tensorflow-lite
设置好后,sync和build整个工程,如果build成功说明,配置成功。
添加tflite文件到assets文件夹
在app目录先新建assets目录,并将 mnist_savedmodel.tflite 文件保存到assets目录。重新编译apk,检查新编译出来的apk的assets文件夹是否有 mnist_cnn.tflite 文件。
点击菜单Build->Build APK(s)触发apk编译,apk编译成功点击右下角的EventLog。点击最后一条信息中的 analyze 链接,会触发apk analyzer查看新编译出来的apk,若在assets目录下存在 mnist_savedmodel.tflite ,则编译打包成功,如下:
- assets
- |__mnist_savedmodel.tflite
加载模型
使用如下函数将 mnist_savedmodel.tflite 文件加载到memory-map中,作为Interpreter实例化的输入
- /** Memory-map the model file in Assets. */
- private MappedByteBuffer loadModelFile(Activity activity) throws IOException {
- AssetFileDescriptor fileDescriptor = activity.getAssets().openFd(mModelPath);
- FileInputStream inputStream = new FileInputStream(fileDescriptor.getFileDescriptor());
- FileChannel fileChannel = inputStream.getChannel();
- long startOffset = fileDescriptor.getStartOffset();
- long declaredLength = fileDescriptor.getDeclaredLength();
- return fileChannel.map(FileChannel.MapMode.READ_ONLY, startOffset, declaredLength);
- }
提示
memory-map可以把整个文件映射到虚拟内存中,用于提升tflite模型的读取性能。更多请参考: JDK API介绍
实例化Interpreter,其中acitivity是为了从assets中获取模型,因为我们把模型编译到assets中,只能通过 getAssets() 打开。
- mTFLite = new Interpreter(loadModelFile(activity));
memory-map后的 MappedByteBuffer 直接作为 Interpreter 的输入, mTFLite ( Interpreter )就是转换后模型的运行载体。
运行输入
我们使用MNIST test测试集中的图片作为输入,mnist图像大小28*28,单像素,因为我们输入的数据需要设置成如下格式
- //Float模型相关参数
- // com/dpthinker/mnistclassifier/model/FloatSavedModelConfig.java
- protected void setConfigs() {
- setModelName("mnist_savedmodel.tflite");
- setNumBytesPerChannel(4);
- setDimBatchSize(1);
- setDimPixelSize(1);
- setDimImgWeight(28);
- setDimImgHeight(28);
- setImageMean(0);
- setImageSTD(255.0f);
- }
- // 初始化
- // com/dpthinker/mnistclassifier/classifier/BaseClassifier.java
- private void initConfig(BaseModelConfig config) {
- this.mModelConfig = config;
- this.mNumBytesPerChannel = config.getNumBytesPerChannel();
- this.mDimBatchSize = config.getDimBatchSize();
- this.mDimPixelSize = config.getDimPixelSize();
- this.mDimImgWidth = config.getDimImgWeight();
- this.mDimImgHeight = config.getDimImgHeight();
- this.mModelPath = config.getModelName();
- }
将MNIST图片转化成 ByteBuffer ,并保持到 imgData ( ByteBuffer )中
- // 将输入的Bitmap转化为Interpreter可以识别的ByteBuffer
- // com/dpthinker/mnistclassifier/classifier/BaseClassifier.java
- protected ByteBuffer convertBitmapToByteBuffer(Bitmap bitmap) {
- int[] intValues = new int[mDimImgWidth * mDimImgHeight];
- scaleBitmap(bitmap).getPixels(intValues,
- 0, bitmap.getWidth(), 0, 0, bitmap.getWidth(), bitmap.getHeight());
- ByteBuffer imgData = ByteBuffer.allocateDirect(
- mNumBytesPerChannel * mDimBatchSize * mDimImgWidth * mDimImgHeight * mDimPixelSize);
- imgData.order(ByteOrder.nativeOrder());
- imgData.rewind();
- // Convert the image toFloating point.
- int pixel = 0;
- for (int i = 0; i < mDimImgWidth; ++i) {
- for (int j = 0; j < mDimImgHeight; ++j) {
- //final int val = intValues[pixel++];
- int val = intValues[pixel++];
- mModelConfig.addImgValue(imgData, val); //添加把Pixel数值转化并添加到ByteBuffer
- }
- }
- return imgData;
- }
- // mModelConfig.addImgValue定义
- // com/dpthinker/mnistclassifier/model/FloatSavedModelConfig.java
- public void addImgValue(ByteBuffer imgData, int val) {
- imgData.putFloat(((val & 0xFF) - getImageMean()) / getImageSTD());
- }
convertBitmapToByteBuffer 的输出即为模型运行的输入。
运行输出
定义一个1*10的多维数组,因为我们只有10个label,具体代码如下
- privateFloat[][] mLabelProbArray = newFloat[1][10];
运行结束后,每个二级元素都是一个label的概率。
运行及结果处理
开始运行模型,具体代码如下
- mTFLite.run(imgData, mLabelProbArray);
针对某个图片,运行后 mLabelProbArray 的内容就是各个label识别的概率。对他们进行排序,找出Top的label并界面呈现给用户.
在Android应用中,笔者使用了 View.OnClickListener() 触发 "image/*" 类型的 Intent.ACTION_GET_CONTENT ,进而获取设备上的图片(只支持MNIST标准图片)。然后,通过 RadioButtion 的选择情况,确认加载哪种转换后的模型,并触发真正分类操作。这部分比较简单,请读者自行阅读代码即可,不再展开介绍。
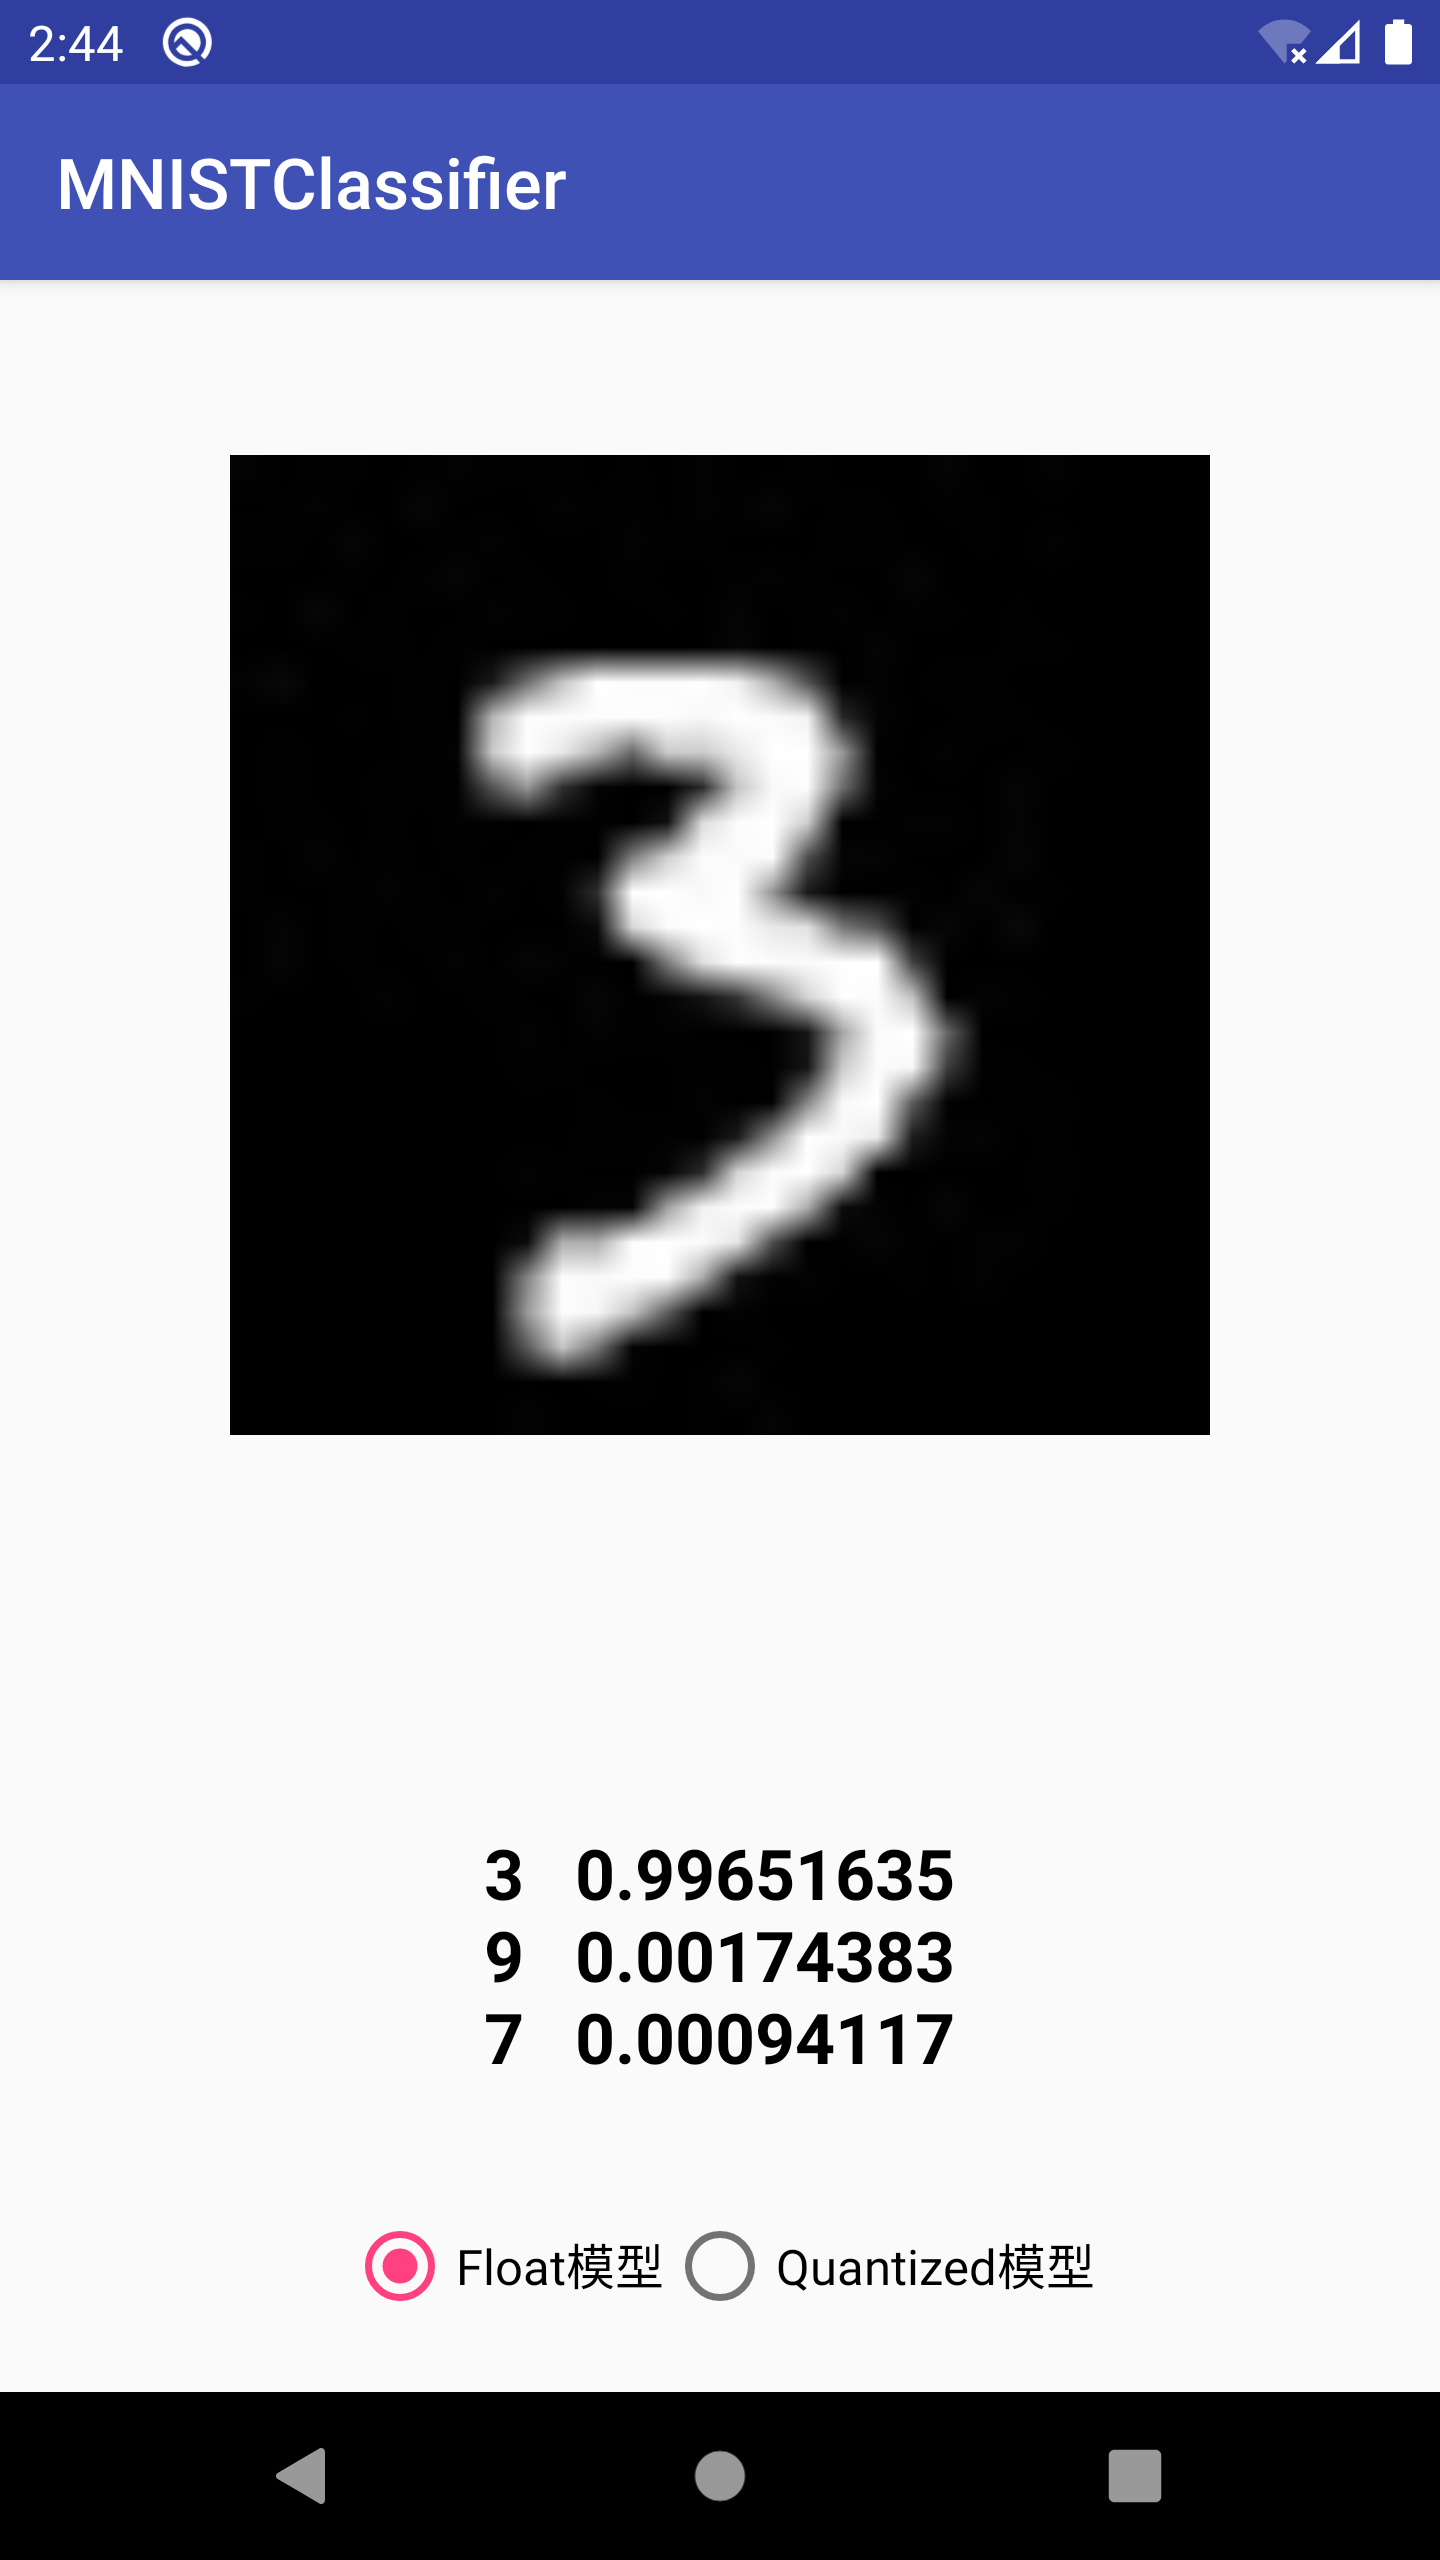
选取一张MNIST测试集中的图片进行测试,得到结果如下:
提示
注意我们这里直接用 mLabelProbArray 数值中的index作为label了,因为MNIST的label完全跟index从0到9匹配。如果是其他的分类问题,需要根据实际情况进行转换。
