我的书签
我的书签
 添加书签
添加书签 移除书签
移除书签- 十三、边框和水平线条
十三、边框和水平线条
欢迎阅读另一个定制教程,在这里我们使用 Matplotlib 讨论边框和水平线条。 有时候你可能想做的事情是改变边框的颜色,或者甚至完全删除它们。
图形的边框基本上是图形的边界,其中有刻度线等东西。为了改变边框的颜色,你可以做一些类似这样的事情:
ax1.spines['left'].set_color('c')
在这里,我们引用了我们的边框字典,表示我们要调整左边框,然后我们使用set_color方法将颜色设置为'c',它是青色。
如果我们想删除所有边框怎么办? 我们可以这样做:
ax1.spines['right'].set_visible(False)ax1.spines['top'].set_visible(False)
这是非常类似的代码,删除了右边框和上边框。
很难看到我们修改了左边框的颜色,所以让我们通过修改线宽来使它变得很明显:
ax1.spines['left'].set_linewidth(5)
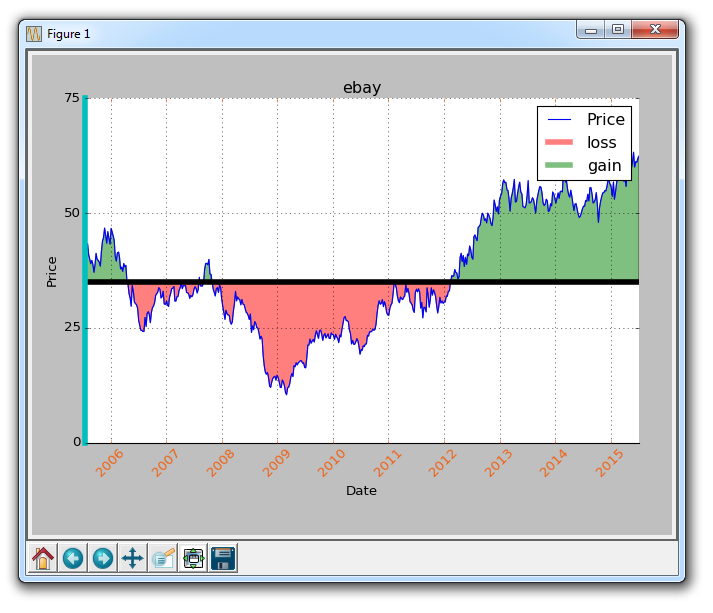
现在,左边框变成了非常粗也非常显眼的青色。 最后,如果我们想修改刻度参数怎么办? 假如不想要黑色的日期,我们想要一些橙色的日期? 没问题!
ax1.tick_params(axis='x', colors='#f06215')
现在我们的日期是橙色了! 接下来,让我们来看看我们如何绘制一条水平线。 你当然可以将你创建的一组新数据绘制成一条水平线,但你不需要这样做。 你可以:
ax1.axhline(closep[0], color='k', linewidth=5)
所以在这里,我们的整个代码是:
import matplotlib.pyplot as pltimport numpy as npimport urllibimport datetime as dtimport matplotlib.dates as mdatesdef bytespdate2num(fmt, encoding='utf-8'):strconverter = mdates.strpdate2num(fmt)def bytesconverter(b):s = b.decode(encoding)return strconverter(s)return bytesconverterdef graph_data(stock):fig = plt.figure()ax1 = plt.subplot2grid((1,1), (0,0))stock_price_url = 'http://chartapi.finance.yahoo.com/instrument/1.0/'+stock+'/chartdata;type=quote;range=10y/csv'source_code = urllib.request.urlopen(stock_price_url).read().decode()stock_data = []split_source = source_code.split('\n')for line in split_source:split_line = line.split(',')if len(split_line) == 6:if 'values' not in line and 'labels' not in line:stock_data.append(line)date, closep, highp, lowp, openp, volume = np.loadtxt(stock_data,delimiter=',',unpack=True,converters={0: bytespdate2num('%Y%m%d')})ax1.plot_date(date, closep,'-', label='Price')ax1.plot([],[],linewidth=5, label='loss', color='r',alpha=0.5)ax1.plot([],[],linewidth=5, label='gain', color='g',alpha=0.5)ax1.axhline(closep[0], color='k', linewidth=5)ax1.fill_between(date, closep, closep[0],where=(closep > closep[0]), facecolor='g', alpha=0.5)ax1.fill_between(date, closep, closep[0],where=(closep < closep[0]), facecolor='r', alpha=0.5)for label in ax1.xaxis.get_ticklabels():label.set_rotation(45)ax1.grid(True)#ax1.xaxis.label.set_color('c')#ax1.yaxis.label.set_color('r')ax1.set_yticks([0,25,50,75])ax1.spines['left'].set_color('c')ax1.spines['right'].set_visible(False)ax1.spines['top'].set_visible(False)ax1.spines['left'].set_linewidth(5)ax1.tick_params(axis='x', colors='#f06215')plt.xlabel('Date')plt.ylabel('Price')plt.title(stock)plt.legend()plt.subplots_adjust(left=0.09, bottom=0.20, right=0.94, top=0.90, wspace=0.2, hspace=0)plt.show()graph_data('ebay')
结果为: