- Make the Static Map Interactive
- 1. Make the Map Dynamic
- 2. Flutter Location Package
- 3. Using the Package
- 4. Hook it up to the map:
- 5. Refactor your StaticMapProvider
- 6. Add the Button
- What You Have So Far:
- 7. Reset Button
- 8. Add Markers
- Fin
Make the Static Map Interactive
1. Make the Map Dynamic
Let's add the functionality for the map to display your current location. Thisstep has multiple parts:
- Install Flutter location package.
- Add a button that will get our location when pressed.
- Rerender the map.
2. Flutter Location Package
We'll be using this package: Flutter Location.
This package is easy to use. Which is great if (like me) you have never developednatively on mobile.
To install the package:
In pubspec.yaml, under dependencies, add the package:
dependencies:flutter:sdk: flutterlocation: ^1.1.6
Then, install the package:
pub get
Then, you have to add the permissions to use the device location:
In the file tree, go to ios/runner/info.plist.
Add these lines four lines under the <dict> tag.
<dict><key>NSLocationWhenInUseUsageDescription</key><string>The app would like to use your location</string><key>NSLocationAlwaysUsageDescription</key><string>The app would like to use your location</string>// ...
That's all for set up on iOS. To set up for Android also, follow theinstructions here.
3. Using the Package
The package is super easy to use. Import the package in your main.dartfile. You'll also need to import Dart's async library, so might as well pull that in:
import 'dart:async';import 'package:location/location.dart';
Then, in your App's HomepageState widget, establish a new instance of the Location class. I'm also establishing a variable that we can assign our location values to.
Location _location = new Location();dynamic deviceLocation;
Now, we can access the tools that this library gives us. I wrote a helperfunction that finds the devices current location.
Future<Null> findUserLocation() async {Map<String, double> location;try {location = await _location.getLocation;setState(() {deviceLocation = location;});} catch (exception) {print(exception);}}
This library will return a map full of key's, which are location attributes(latitude, longitude, altitude, etc) and values which are doublerepresentations of the keys. As long as the user allows the app to use locationdata, then your deviceLocation will now look someting like this:
{"latitude": 0.0,"longitude": 0.0,"altitude": 0.0,"accuracy": 0.0,}
4. Hook it up to the map:
Finally we need to add a button that:
- Fetches our location.
- Set's the state with the new location.
- When the state is set, it will rebuild our staticMapProvider Widget, so we need to refactor that a bit too.
5. Refactor your StaticMapProvider
The SMP now needs to take in a location, and render the location it's given, or a default if none is given. To acheive this, give the SMP an optional argument:
class StaticMapsProvider extends StatefulWidget {final String googleMapsApiKey;final Map<String, double> currentLocation;StaticMapsProvider(this.googleMapsApiKey, {this.currentLocation});// ...
Now in our _buildUrl() method, we'll want to keep the base URL, but then add query parameters if there's a location.
_buildUrl(Map currentLocation) {var baseUri = new Uri(scheme: 'https',host: 'maps.googleapis.com',port: 443,path: '/maps/api/staticmap',queryParameters: {'size': '${defaultWidth}x$defaultHeight','center':'${defaultLocation['latitude']},${defaultLocation['longitude']}','zoom': '4','${widget.googleMapsApiKey}': ''});var finalUrl = baseUri;if (widget.currentLocation != null) {// this replaces the entire `queryParameters` property, so we have to pass in size, zoom, and apiKey again.finalUrl = baseUri.replace(queryParameters: {'center': '${currentLocation['latitude']},${currentLocation['longitude']}','zoom': '15','${widget.googleMapsApiKey}': '','size': '$defaultWidthx$defaultHeight',});}setState(() {renderUrl = finalUrl.toString();});}
6. Add the Button
Finally, back in our main.dart, add the raised button we'll need:
//... the build method in _MyHomePageState:@overrideWidget build(BuildContext context) {return new Scaffold(appBar: new AppBar(title: new Text(widget.title),),body: new Container(child: new Column(children: <Widget>[new StaticMapsProvider(googleMapsApiKey, currentLocation:deviceLocation),new Container(// Some extra layout code to save us time in the future:margin: const EdgeInsets.only(top: 5.0),child: new Row(mainAxisAlignment: MainAxisAlignment.spaceEvenly,children: <Widget>[new RaisedButton(onPressed: findUserLocation,child: new Text('Get My Current Location'),color: Theme.of(context).primaryColor,),],),),],)));}}//...
What You Have So Far:

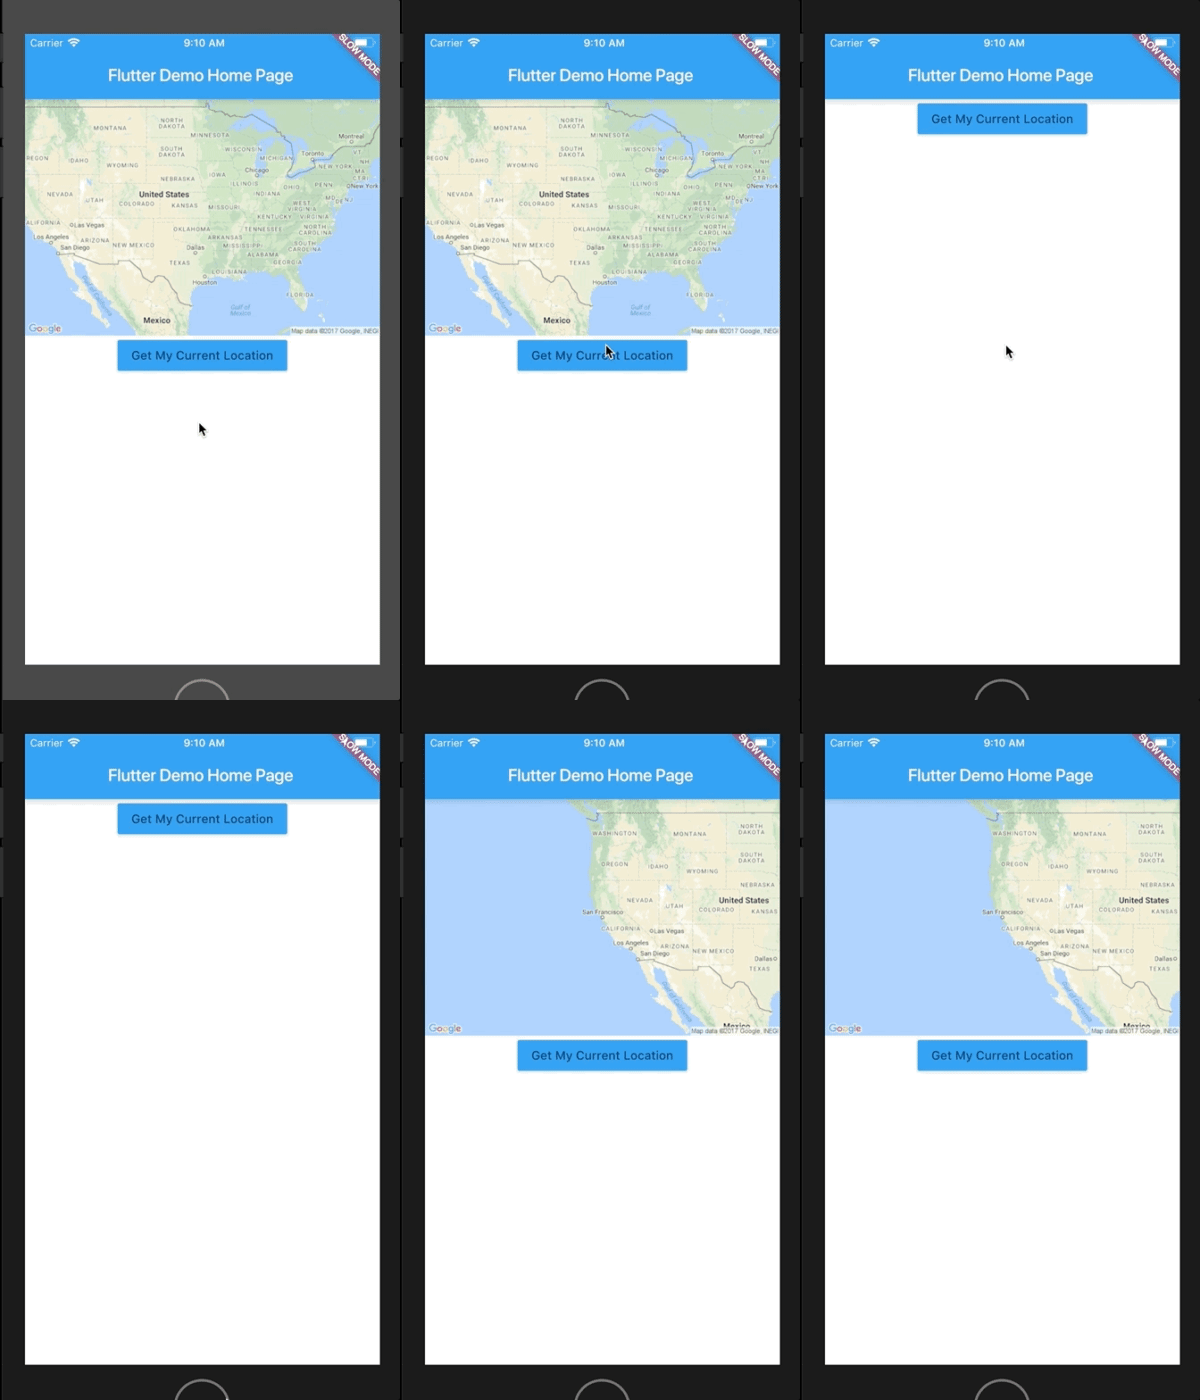
Nice! An app that renders static maps based on device location. This is nice, but we need to add a bit more functionality to see how this can be useful.
Aso, this is obviously ugly, but Flutter makes it really easy to solve thatproblem with transitions and animations. Here's an article I wrote on making those useful.
7. Reset Button
First, let's add the reset button quickly. This button will let you re-render the app back to default, which is nice for testing. Start by adding the Button to your main.dart build function:
//...new Container(margin: const EdgeInsets.only(top: 5.0),child: new Row(mainAxisAlignment: MainAxisAlignment.spaceEvenly,children: <Widget>[new RaisedButton(onPressed: findUserLocation,child: new Text('Get My Current Location'),color: Theme.of(context).primaryColor,),// The new code:new RaisedButton(onPressed: resetMap,child: new Text('Reset Map'),color: Theme.of(context).primaryColor,),],//...
And now, add the resetMap method.
void resetMap() {// Flutter knows to rerender, but it's passing null to our StaticMapsProvider, which means it'll render the default values.setState(() {deviceLocation = null;});}
8. Add Markers
If you look at the finished product, which can be found in this repository, you'll see thatthere are several different pieces of functionality we can add. I believe thatdynamically rendering markers is the most useful and the most difficult, so let's tackle that for now.
This requires a bit of a refactor.
Right now, our StaticMapProvider is expecting to possibly receive a location tocenter on. In order to place markers, you may want to pass multiple locations.So the first thing we need to do it refactor the StaticMapProvider to acceptthat.
class StaticMapsProvider extends StatefulWidget {final String googleMapsApiKey;final List locations;final Map currentLocation;StaticMapsProvider(this.googleMapsApiKey, {this.locations});//...
Then we need to change our buildUrl method.
- You can remove the query params from the baseUri declaration. From here onout, we will use the same baseUri no matter what, then add query params based on the locations passed in.
- We need to check if there are markers on the map. The differencebetween this maps is that without markers there is only one location. So ifthere is only one location, we'll add certain query params.
_buildUrl(Map currentLocation, List locations) {var finalUri;var baseUri = new Uri(scheme: 'https',host: 'maps.googleapis.com',port: 443,path: '/maps/api/staticmap',queryParameters: {});// the first case, which handles a user location but no markersif (currentLocation != null && widget.markers.length == 0) {finalUri = baseUri.replace(queryParameters: {'center':'${currentLocation['latitude']},${currentLocation['longitude']}','zoom': widget.zoom.toString(),'size': '${width ?? defaultWidth}x${height ?? defaultHeight}','${widget.googleMapsApiKey}': ''});}setState(() {renderUrl = finalUrl.toString();});}// .. And then add a check in your build method:Widget build(BuildContext context) {// If locations is empty, then we need to render the default map.var currentLocation = widget.currentLocation;if (widget.currentLocation == null) {currentLocation = defaultLocation;}_buildUrl(currentLocation, widget.markers);}
Until we refactor main.dart to pass our StaticMapsProvider a list of locations, this won't work.
class _MyHomePageState extends State<MyHomePage> {String googleMapsApiKey = 'AIzaSyCzxj6UFfx8uvDaaE9OSSPkjJXdou3jD9I';Location _location = new Location();Map<String, double> _currentLocation;List locations = [];Future<Null> findUserLocation() async {Map<String, double> location;try {location = await _location.getLocation;setState(() {_currentLocation = {"latitude": location["latitude"],"longitude": location['longitude'],};});} catch (exception) {}}void resetMap() {setState(() {_currentLocation = null;locations = [];});}//...
Then, in the build method, change the second argument to StaticMapsProvider constructor:
children: <Widget>[new StaticMap(googleMapsApi,currentLocation: _currentLocation,markers: locations),
This refactor gets us back to where we need to be in order to start giving the map some markers.
Let's start by adding the UI, where the user can insert a Lat and Lng. Underneath your Current Location and Settings buttons, add this code to the Column widget's children.
new Container(margin: new EdgeInsets.symmetric(horizontal: 25.0, vertical: 25.0),child: new Column(children: <Widget>[new TextField(controller: _latController,decoration: const InputDecoration(labelText: 'latitude',)),new TextField(controller: _lngController,decoration: const InputDecoration(labelText: 'longitude',)),new Container(margin: const EdgeInsets.symmetric(vertical: 10.0),child: new RaisedButton(onPressed: handleSubmitNewMarker,child: new Text('Place Marker'),color: Theme.of(context).primaryColor,),),],),),
And, in order to make this work, we need to add some more functionality to our Widget. Add these text editing controllers to the widget:
class _MyHomePageState extends State<MyHomePage> {Location _location = new Location();List locations = [];String googleMapsApi = 'AIzaSyCzxj6UFfx8uvDaaE9OSSPkjJXdou3jD9I';TextEditingController _latController = new TextEditingController();TextEditingController _lngController = new TextEditingController();
Text editing controllers are what allow us to get the values of text fields, clear text fields, etc. They're a bit outside the scope of this tutorial, but this is pretty much the extent of their use in 90% of cases I've come across.
We'll also need to write the method that gets the information from these text fields and turns it into something useful for us. This is what I wrote:
void handleSubmitNewMarker() {String lat;String lng;// grab the values out of the text fields:lat = _latController.text;lng = _lngController.text;// Add the new location to the locations List.// Doing this inside SetState will cause a re-render:setState(() {locations.add({"latitude": lat, "longitude": lng});});// clear the text fields so its more user friendly:_lngController.clear();_latController.clear();}
This is all that the main.app state needs to do. But right now, if you tryto add a marker, all of the checks in StaticMapProvider class will fail. You'veonly written what to do if there's only one location in our markers List.By adding a marker, there are now two locations.
The bulk of the work is in the _buildUrl method.
Google's Static Maps api expects each marker's lat and lng to be passed in asa query parameter, separated by pipes (|). The approach here changes the waywe build the query params — the base URI stays the same.
- Check the length of the
markersList. (If it's 0, just center the map onthe user.) - If it's more than 1, we need to build the
markersportion of query params. - First, add the users location.
- Then, for each location, build a new String formatted like this:
'latitude, longitude'. - Join each of those mini strings with a
|.The conditional statement that checks width should now look like this:
if (currentLocation != null && widget.markers.length == 0) {// just center the map on the users locationfinalUri = baseUri.replace(queryParameters: {'center':'${currentLocation['latitude']},${currentLocation['longitude']}','zoom': widget.zoom.toString(),'size': '${width ?? defaultWidth}x${height ?? defaultHeight}','${widget.googleMapsApiKey}': ''});} else {List<String> markers = new List();// Add a blue marker for the uservar userLat = currentLocation['latitude'];var userLng = currentLocation['longitude'];String marker = '$userLat,$userLng';markers.add(marker);// Add a red marker for each location you decide to addwidget.markers.forEach((location) {var lat = location['latitude'];var lng = location['longitude'];String marker = '$lat,$lng';markers.add(marker);});String markersString = markers.join('|');finalUri = baseUri.replace(queryParameters: {'markers': markersString,'size': '${width ?? defaultWidth}x${height ?? defaultHeight}','${widget.googleMapsApiKey}': ''});}
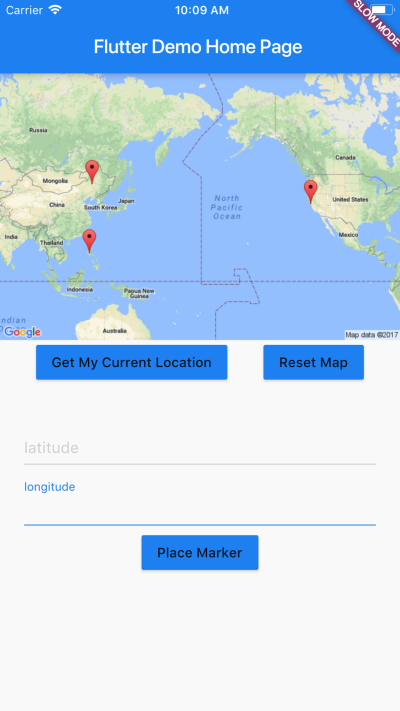
Now, you should be able to Focus on your current location, reset the map, and place markers anywhere. Here's a screen shot:

Fin
To add interactivity to the map (such as the zoom buttons), checkout the repo
In the next section, you'll see how to continuously update your device locationwith Dart Streams.
