 我的书签
我的书签
 添加书签
添加书签 移除书签
移除书签- 2.5 面向对象
- method
- 指针作为receiver
- method继承
- method重写
- links
- method
2.5 面向对象
前面两章我们介绍了函数和struct,那你是否想过函数当作struct的字段一样来处理呢?今天我们就讲解一下函数的另一种形态,带有接收者的函数,我们称为method
method
现在假设有这么一个场景,你定义了一个struct叫做长方形,你现在想要计算他的面积,那么按照我们一般的思路应该会用下面的方式来实现
package mainimport "fmt"type Rectangle struct {width, height float64}func area(r Rectangle) float64 {return r.width*r.height}func main() {r1 := Rectangle{12, 2}r2 := Rectangle{9, 4}fmt.Println("Area of r1 is: ", area(r1))fmt.Println("Area of r2 is: ", area(r2))}
这段代码可以计算出来长方形的面积,但是area()不是作为Rectangle的方法实现的(类似面向对象里面的方法),而是将Rectangle的对象(如r1,r2)作为参数传入函数计算面积的。
这样实现当然没有问题咯,但是当需要增加圆形、正方形、五边形甚至其它多边形的时候,你想计算他们的面积的时候怎么办啊?那就只能增加新的函数咯,但是函数名你就必须要跟着换了,变成area_rectangle, area_circle, area_triangle...
像下图所表示的那样, 椭圆代表函数, 而这些函数并不从属于struct(或者以面向对象的术语来说,并不属于class),他们是单独存在于struct外围,而非在概念上属于某个struct的。
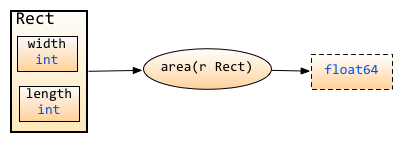
图2.8 方法和struct的关系图
很显然,这样的实现并不优雅,并且从概念上来说”面积”是”形状”的一个属性,它是属于这个特定的形状的,就像长方形的长和宽一样。
基于上面的原因所以就有了method的概念,method是附属在一个给定的类型上的,他的语法和函数的声明语法几乎一样,只是在func后面增加了一个receiver(也就是method所依从的主体)。
用上面提到的形状的例子来说,method area() 是依赖于某个形状(比如说Rectangle)来发生作用的。Rectangle.area()的发出者是Rectangle, area()是属于Rectangle的方法,而非一个外围函数。
更具体地说,Rectangle存在字段length 和 width, 同时存在方法area(), 这些字段和方法都属于Rectangle。
用Rob Pike的话来说就是:
“A method is a function with an implicit first argument, called a receiver.”
method的语法如下:
func (r ReceiverType) funcName(parameters) (results)
下面我们用最开始的例子用method来实现:
package mainimport ("fmt""math")type Rectangle struct {width, height float64}type Circle struct {radius float64}func (r Rectangle) area() float64 {return r.width*r.height}func (c Circle) area() float64 {return c.radius * c.radius * math.Pi}func main() {r1 := Rectangle{12, 2}r2 := Rectangle{9, 4}c1 := Circle{10}c2 := Circle{25}fmt.Println("Area of r1 is: ", r1.area())fmt.Println("Area of r2 is: ", r2.area())fmt.Println("Area of c1 is: ", c1.area())fmt.Println("Area of c2 is: ", c2.area())}
在使用method的时候重要注意几点
- 虽然method的名字一模一样,但是如果接收者不一样,那么method就不一样
- method里面可以访问接收者的字段
- 调用method通过
.访问,就像struct里面访问字段一样
图示如下:
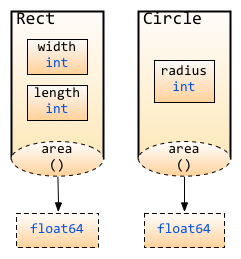
图2.9 不同struct的method不同
在上例,method area() 分别属于Rectangle和Circle, 于是他们的 Receiver 就变成了Rectangle 和 Circle, 或者说,这个area()方法 是由 Rectangle/Circle 发出的。
值得说明的一点是,图示中method用虚线标出,意思是此处方法的Receiver是以值传递,而非引用传递,是的,Receiver还可以是指针, 两者的差别在于, 指针作为Receiver会对实例对象的内容发生操作,而普通类型作为Receiver仅仅是以副本作为操作对象,并不对原实例对象发生操作。后文对此会有详细论述。
那是不是method只能作用在struct上面呢?当然不是咯,他可以定义在任何你自定义的类型、内置类型、struct等各种类型上面。这里你是不是有点迷糊了,什么叫自定义类型,自定义类型不就是struct嘛,不是这样的哦,struct只是自定义类型里面一种比较特殊的类型而已,还有其他自定义类型申明,可以通过如下这样的申明来实现。
type typeName typeLiteral
请看下面这个申明自定义类型的代码
type ages inttype money float32type months map[string]intm := months {"January":31,"February":28,..."December":31,}
看到了吗?简单的很吧,这样你就可以在自己的代码里面定义有意义的类型了,实际上只是一个定义了一个别名,有点类似于c中的typedef,例如上面ages替代了int
好了,让我们回到method
你可以在任何的自定义类型中定义任意多的method,接下来让我们看一个复杂一点的例子
package mainimport "fmt"const(WHITE = iotaBLACKBLUEREDYELLOW)type Color bytetype Box struct {width, height, depth float64color Color}type BoxList []Box //a slice of boxesfunc (b Box) Volume() float64 {return b.width * b.height * b.depth}func (b *Box) SetColor(c Color) {b.color = c}func (bl BoxList) BiggestColor() Color {v := 0.00k := Color(WHITE)for _, b := range bl {if bv := b.Volume(); bv > v {v = bvk = b.color}}return k}func (bl BoxList) PaintItBlack() {for i := range bl {bl[i].SetColor(BLACK)}}func (c Color) String() string {strings := []string {"WHITE", "BLACK", "BLUE", "RED", "YELLOW"}return strings[c]}func main() {boxes := BoxList {Box{4, 4, 4, RED},Box{10, 10, 1, YELLOW},Box{1, 1, 20, BLACK},Box{10, 10, 1, BLUE},Box{10, 30, 1, WHITE},Box{20, 20, 20, YELLOW},}fmt.Printf("We have %d boxes in our set\n", len(boxes))fmt.Println("The volume of the first one is", boxes[0].Volume(), "cm³")fmt.Println("The color of the last one is",boxes[len(boxes)-1].color.String())fmt.Println("The biggest one is", boxes.BiggestColor().String())fmt.Println("Let's paint them all black")boxes.PaintItBlack()fmt.Println("The color of the second one is", boxes[1].color.String())fmt.Println("Obviously, now, the biggest one is", boxes.BiggestColor().String())}
上面的代码通过const定义了一些常量,然后定义了一些自定义类型
- Color作为byte的别名
- 定义了一个struct:Box,含有三个长宽高字段和一个颜色属性
- 定义了一个slice:BoxList,含有Box
然后以上面的自定义类型为接收者定义了一些method
- Volume()定义了接收者为Box,返回Box的容量
- SetColor(c Color),把Box的颜色改为c
- BiggestColor()定在在BoxList上面,返回list里面容量最大的颜色
- PaintItBlack()把BoxList里面所有Box的颜色全部变成黑色
- String()定义在Color上面,返回Color的具体颜色(字符串格式)
上面的代码通过文字描述出来之后是不是很简单?我们一般解决问题都是通过问题的描述,去写相应的代码实现。
指针作为receiver
现在让我们回过头来看看SetColor这个method,它的receiver是一个指向Box的指针,是的,你可以使用*Box。想想为啥要使用指针而不是Box本身呢?
我们定义SetColor的真正目的是想改变这个Box的颜色,如果不传Box的指针,那么SetColor接受的其实是Box的一个copy,也就是说method内对于颜色值的修改,其实只作用于Box的copy,而不是真正的Box。所以我们需要传入指针。
这里可以把receiver当作method的第一个参数来看,然后结合前面函数讲解的传值和传引用就不难理解
这里你也许会问了那SetColor函数里面应该这样定义*b.Color=c,而不是b.Color=c,因为我们需要读取到指针相应的值。
你是对的,其实Go里面这两种方式都是正确的,当你用指针去访问相应的字段时(虽然指针没有任何的字段),Go知道你要通过指针去获取这个值,看到了吧,Go的设计是不是越来越吸引你了。
也许细心的读者会问这样的问题,PaintItBlack里面调用SetColor的时候是不是应该写成(&bl[i]).SetColor(BLACK),因为SetColor的receiver是*Box,而不是Box。
你又说对的,这两种方式都可以,因为Go知道receiver是指针,他自动帮你转了。
也就是说:
如果一个method的receiver是*T,你可以在一个T类型的实例变量V上面调用这个method,而不需要&V去调用这个method
类似的
如果一个method的receiver是T,你可以在一个T类型的变量P上面调用这个method,而不需要 P去调用这个method
所以,你不用担心你是调用的指针的method还是不是指针的method,Go知道你要做的一切,这对于有多年C/C++编程经验的同学来说,真是解决了一个很大的痛苦。
method继承
前面一章我们学习了字段的继承,那么你也会发现Go的一个神奇之处,method也是可以继承的。如果匿名字段实现了一个method,那么包含这个匿名字段的struct也能调用该method。让我们来看下面这个例子
package mainimport "fmt"type Human struct {name stringage intphone string}type Student struct {Human //匿名字段school string}type Employee struct {Human //匿名字段company string}//在human上面定义了一个methodfunc (h *Human) SayHi() {fmt.Printf("Hi, I am %s you can call me on %s\n", h.name, h.phone)}func main() {mark := Student{Human{"Mark", 25, "222-222-YYYY"}, "MIT"}sam := Employee{Human{"Sam", 45, "111-888-XXXX"}, "Golang Inc"}mark.SayHi()sam.SayHi()}
method重写
上面的例子中,如果Employee想要实现自己的SayHi,怎么办?简单,和匿名字段冲突一样的道理,我们可以在Employee上面定义一个method,重写了匿名字段的方法。请看下面的例子
package mainimport "fmt"type Human struct {name stringage intphone string}type Student struct {Human //匿名字段school string}type Employee struct {Human //匿名字段company string}//Human定义methodfunc (h *Human) SayHi() {fmt.Printf("Hi, I am %s you can call me on %s\n", h.name, h.phone)}//Employee的method重写Human的methodfunc (e *Employee) SayHi() {fmt.Printf("Hi, I am %s, I work at %s. Call me on %s\n", e.name,e.company, e.phone) //Yes you can split into 2 lines here.}func main() {mark := Student{Human{"Mark", 25, "222-222-YYYY"}, "MIT"}sam := Employee{Human{"Sam", 45, "111-888-XXXX"}, "Golang Inc"}mark.SayHi()sam.SayHi()}
上面的代码设计的是如此的美妙,让人不自觉的为Go的设计惊叹!
通过这些内容,我们可以设计出基本的面向对象的程序了,但是Go里面的面向对象是如此的简单,没有任何的私有、公有关键字,通过大小写来实现(大写开头的为公有,小写开头的为私有),方法也同样适用这个原则。
links
- 目录
- 上一章: struct类型
- 下一节: interface
