 我的书签
我的书签
 添加书签
添加书签 移除书签
移除书签- SR-IOV
- SR-IOV要求
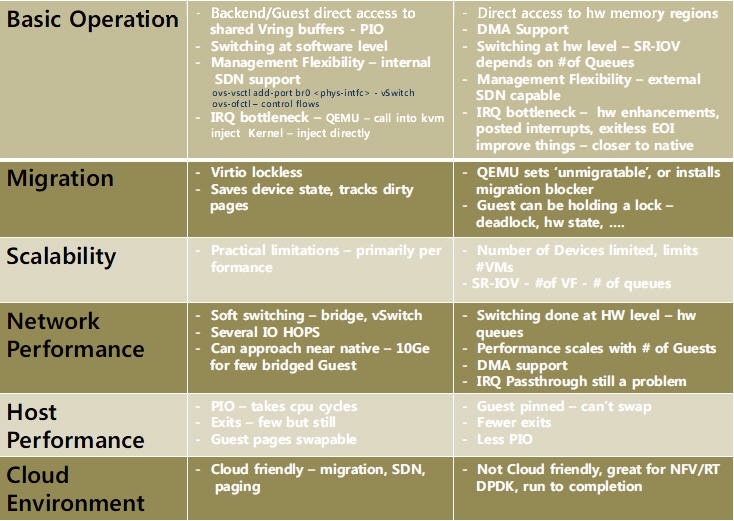
- SR-IOV vs PCI path-through
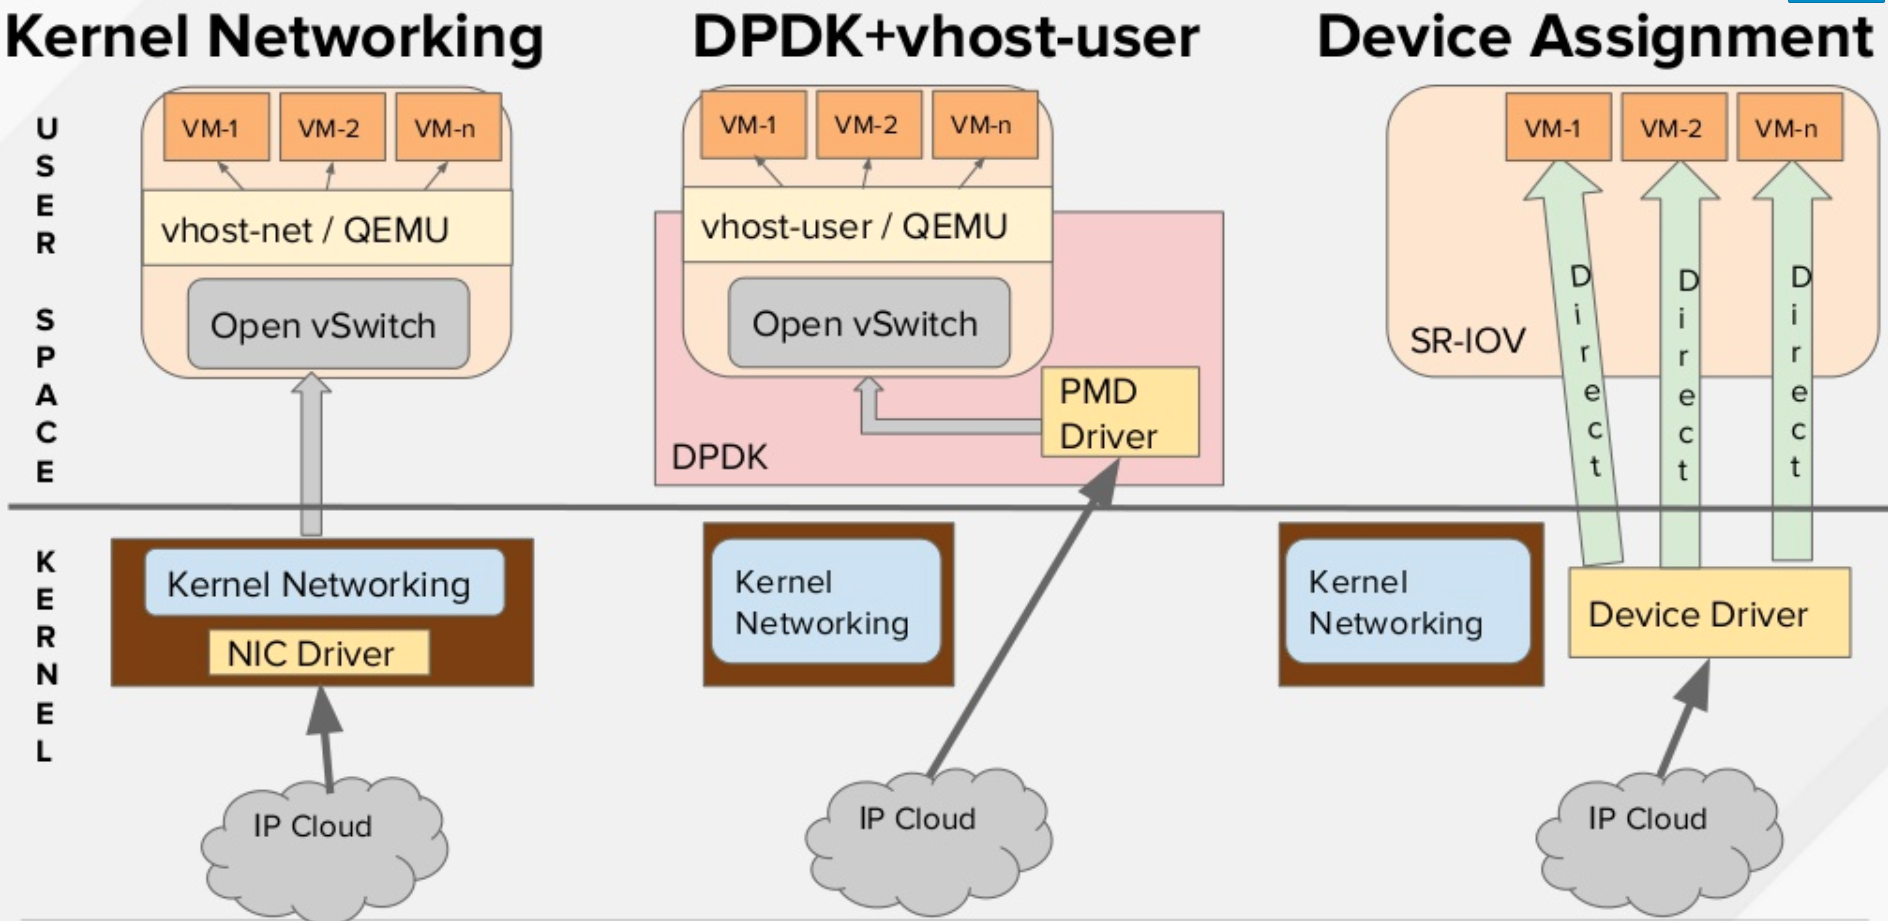
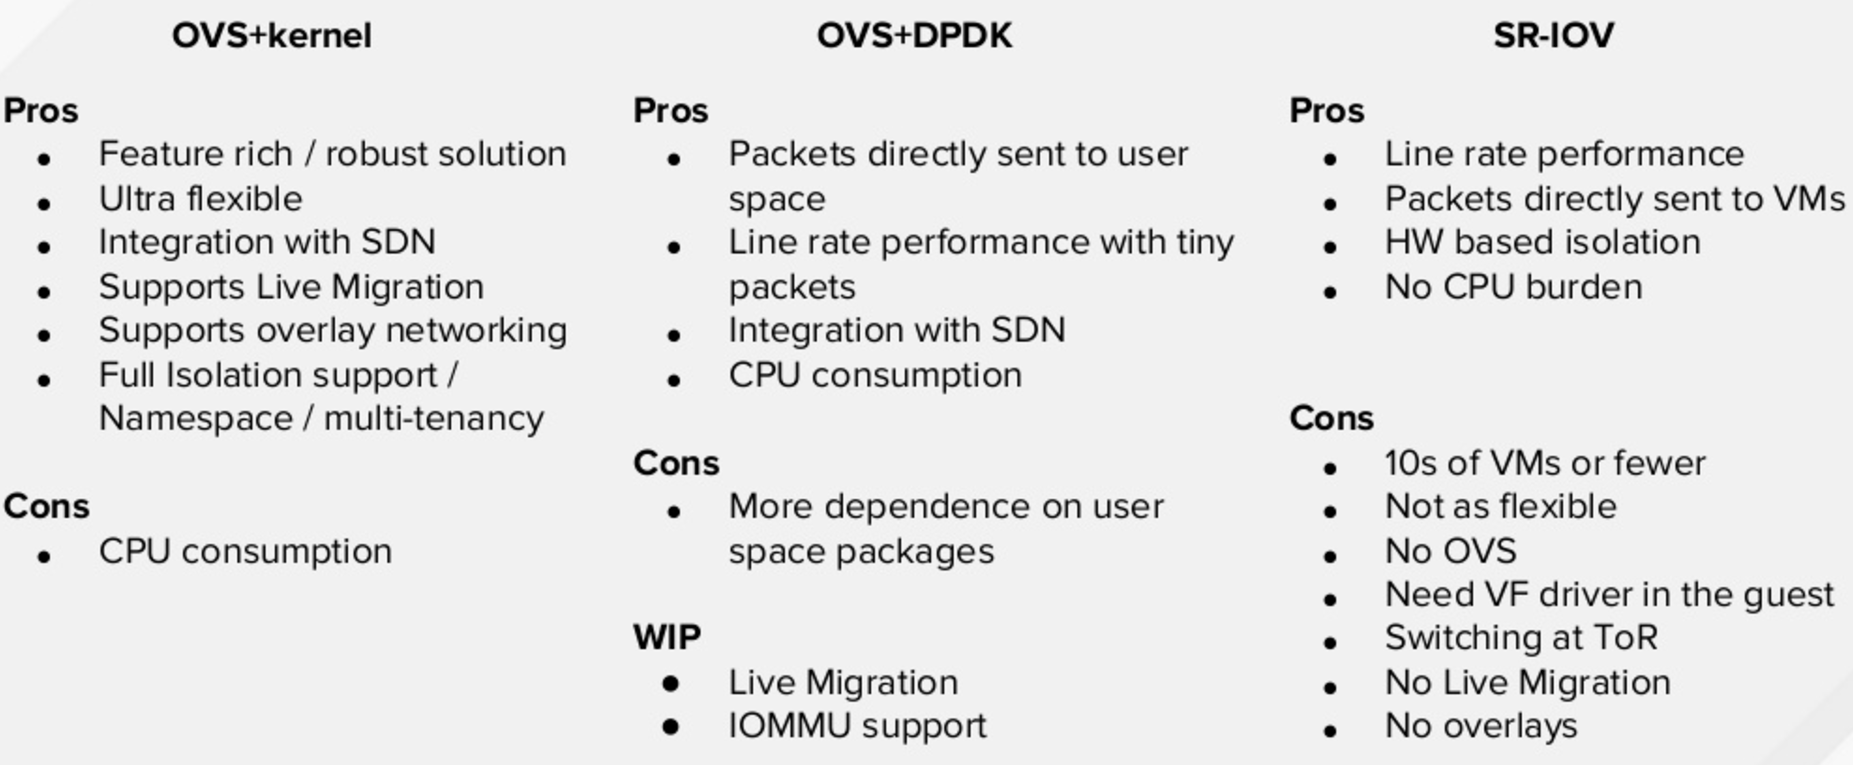
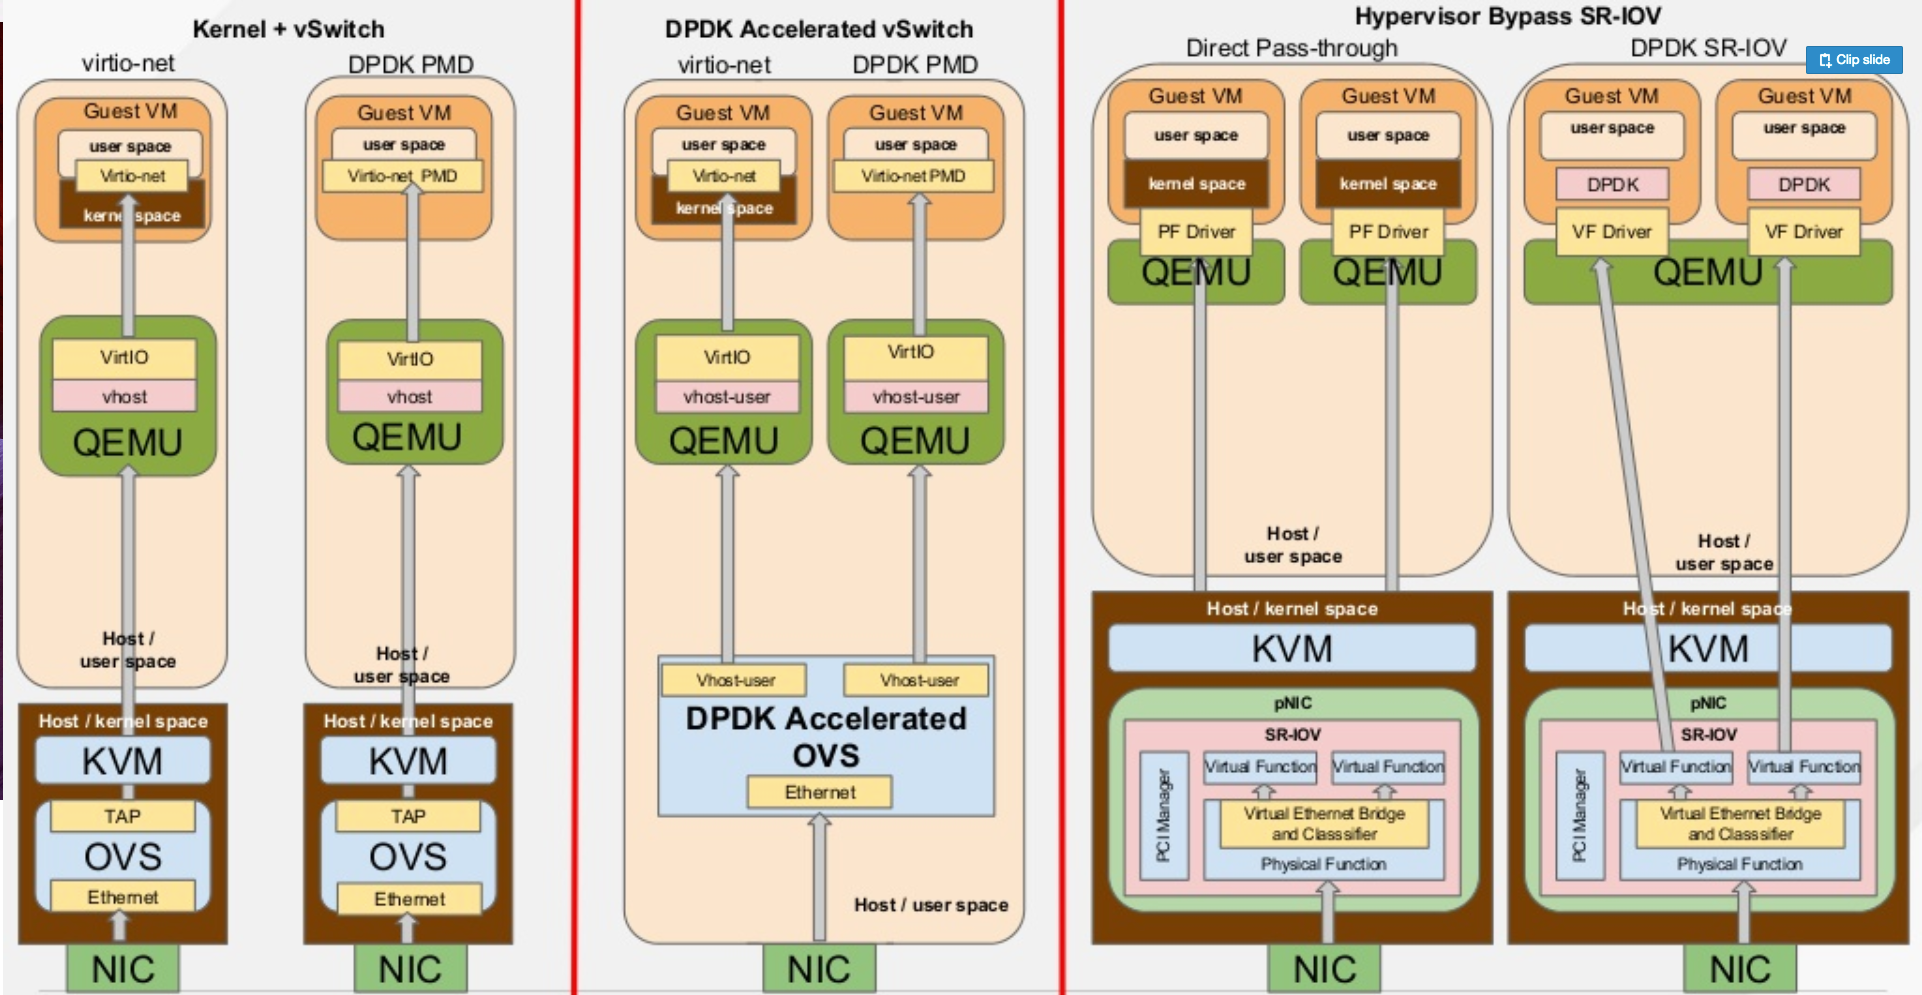
- SR-IOV vs DPDK
- SR-IOV使用示例
- 优缺点
- 参考文档
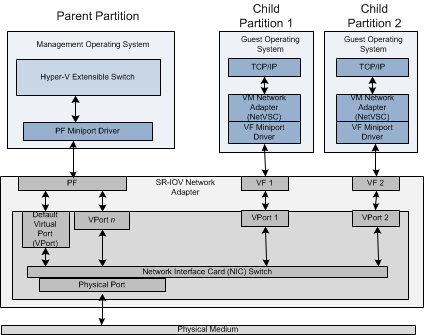
SR-IOV
SR-IOV(Single Root I/O Virtualization)是一个将PCIe共享给虚拟机的标准,通过为虚拟机提供独立的内存空间、中断、DMA流,来绕过VMM实现数据访问。SR-IOV基于两种PCIe functions:
- PF (Physical Function): 包含完整的PCIe功能,包括SR-IOV的扩张能力,该功能用于SR-IOV的配置和管理。
- FV (Virtual Function): 包含轻量级的PCIe功能。每一个VF有它自己独享的PCI配置区域,并且可能与其他VF共享着同一个物理资源
SR-IOV要求
- CPU 必须支持IOMMU(比如英特尔的 VT-d 或者AMD的 AMD-Vi,Power8 处理器默认支持IOMMU)
- 固件Firmware 必须支持IOMMU
- CPU 根桥必须支持 ACS 或者ACS等价特性
- PCIe 设备必须支持ACS 或者ACS等价特性
- 建议根桥和PCIe 设备中间的所有PCIe 交换设备都支持ACS,如果某个PCIe交换设备不支持ACS,其后的所有PCIe设备只能共享某个IOMMU 组,所以只能分配给1台虚机。
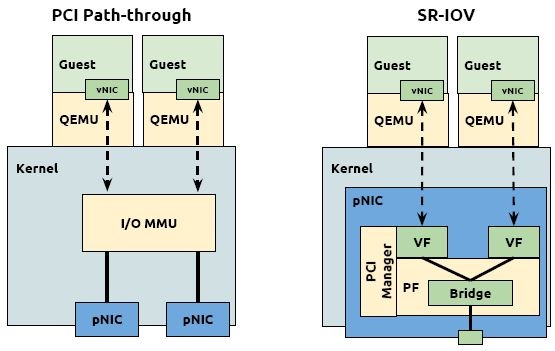
SR-IOV vs PCI path-through
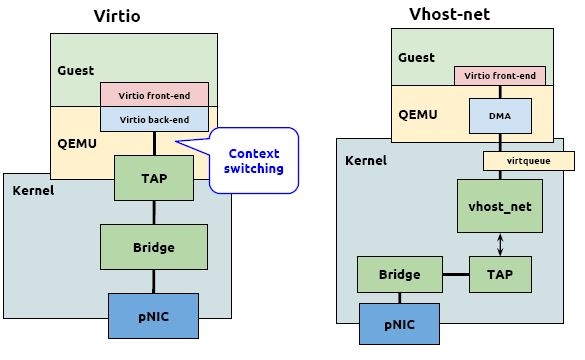
SR-IOV vs DPDK
SR-IOV使用示例
开启VF:
modprobe -r igbmodprobe igb max_vfs=7echo "options igb max_vfs=7" >>/etc/modprobe.d/igb.conf
查找Virtual Function:
# lspci | grep 825760b:00.0 Ethernet controller: Intel Corporation 82576 Gigabit Network Connection (rev 01)0b:00.1 Ethernet controller: Intel Corporation 82576 Gigabit Network Connection(rev 01)0b:10.0 Ethernet controller: Intel Corporation 82576 Virtual Function (rev 01)0b:10.1 Ethernet controller: Intel Corporation 82576 Virtual Function (rev 01)0b:10.2 Ethernet controller: Intel Corporation 82576 Virtual Function (rev 01)0b:10.3 Ethernet controller: Intel Corporation 82576 Virtual Function (rev 01)0b:10.4 Ethernet controller: Intel Corporation 82576 Virtual Function (rev 01)0b:10.5 Ethernet controller: Intel Corporation 82576 Virtual Function (rev 01)0b:10.6 Ethernet controller: Intel Corporation 82576 Virtual Function (rev 01)0b:10.7 Ethernet controller: Intel Corporation 82576 Virtual Function (rev 01)0b:11.0 Ethernet controller: Intel Corporation 82576 Virtual Function (rev 01)0b:11.1 Ethernet controller: Intel Corporation 82576 Virtual Function (rev 01)0b:11.2 Ethernet controller: Intel Corporation 82576 Virtual Function (rev 01)0b:11.3 Ethernet controller: Intel Corporation 82576 Virtual Function (rev 01)0b:11.4 Ethernet controller: Intel Corporation 82576 Virtual Function (rev 01)0b:11.5 Ethernet controller: Intel Corporation 82576 Virtual Function (rev 01)# virsh nodedev-list | grep 0bpci_0000_0b_00_0pci_0000_0b_00_1pci_0000_0b_10_0pci_0000_0b_10_1pci_0000_0b_10_2pci_0000_0b_10_3pci_0000_0b_10_4pci_0000_0b_10_5pci_0000_0b_10_6pci_0000_0b_11_7pci_0000_0b_11_1pci_0000_0b_11_2pci_0000_0b_11_3pci_0000_0b_11_4pci_0000_0b_11_5
$ virsh nodedev-dumpxml pci_0000_0b_00_0<device><name>pci_0000_0b_00_0</name><parent>pci_0000_00_01_0</parent><driver><name>igb</name></driver><capability type='pci'><domain>0</domain><bus>11</bus><slot>0</slot><function>0</function><product id='0x10c9'>82576 Gigabit Network Connection</product><vendor id='0x8086'>Intel Corporation</vendor></capability></device>
通过libvirt绑定到虚拟机
$ cat >/tmp/interface.xml <<EOF<interface type='hostdev' managed='yes'><source><address type='pci' domain='0' bus='11' slot='16' function='0'/></source></interface>EOF$ virsh attach-device MyGuest /tmp/interface. xml --live --config
当然也可以给网卡配置MAC地址和VLAN:
<interface type='hostdev' managed='yes'><source><address type='pci' domain='0' bus='11' slot='16' function='0'/></source><mac address='52:54:00:6d:90:02'><vlan><tag id='42'/></vlan><virtualport type='802.1Qbh'><parameters profileid='finance'/></virtualport></interface>
通过Qemu绑定到虚拟机
/usr/bin/qemu-kvm -name vdisk -enable-kvm -m 512 -smp 2 \-hda /mnt/nfs/vdisk.img \-monitor stdio \-vnc 0.0.0.0:0 \-device pci-assign,host=0b:00.0
优缺点
Pros:
- More Scalable than Direct Assign
- Security through IOMMU and function isolation
- Control Plane separation through PF/VF notion
- High packet rate, Low CPU, Low latency thanks to Direct Pass through
Cons:
- Rigid: Composability issues
- Control plane is pass through, puts pressure on Hardware resources
- Parts of the PCIe config space are direct map from Hardware
- Limited scalability (16 bit)
- SR-IOV NIC forces switching features into the HW
- All the Switching Features in the Hardware or nothing
参考文档
- Intel SR-IOV Configuration Guide
- OpenStack SR-IOV Passthrough for Networking
- Redhat OpenStack SR-IOV Configure
- SDN Fundamentails for NFV, Openstack and Containers
- I/O设备直接分配和SRIOV
- Libvirt PCI passthrough of host network devices
- Story of Network Virtualization and its future in Software and Hardware
