 我的书签
我的书签
 添加书签
添加书签 移除书签
移除书签- 着色器和材质
- 什么是着色器
- 自定义着色器
- 什么是材质
- 渲染方法(Technique)
- 通道(Pass)
- 材质文件格式
- 字段定义
- 枚举类型定义
- 内建 uniform 变量名
着色器和材质
什么是着色器
从维基百科:
在计算机图形学领域,着色器(Shader) 是一种特殊类型的计算机程序,最初用于做阴影,在图像中产生适当的光照、明暗,现在主要用于产生特殊效果,也用于视频后期处理。
非专业人士的定义可能是:告诉计算机如何以一种特定的方式绘制东西的程序。简单地说,着色器就是运行在 GPU 上用于图像渲染的一段程序,Cocos2d-x 用它绘制节点。
Cocos2d-x 使用的着色器语言是 OpenGL ES Shading Language v1.0,描述 GLSL 语言不在本文的范围之内。想了解更多,请参考 规范文档。在 Cocos2d-x 中,所有的可渲染的 Node 对象都使用着色器。比如,Sprite 对象使用为 2D 精灵优化过的着色器,Sprite3D 使用为 3D 对象优化过的着色器。
自定义着色器
开发者能为任一 Cocos2d-x 的节点对象设置自定义的着色器,添加着色器示例:
sprite->setProgramState(programState);sprite3d->setProgramState(programState);
ProgramState 对象包含两个重要的东西
Program:从根本上来说就是着色器。包含一个顶点着色器和一个像素着色器。- 状态属性:根本上来说就是着色器的 uniform 变量如果你不熟悉 uniform 变量也不知道为什么需要它,请参考刚才提到的 语言规范
可以很容易的将 uniform 变量设置到 ProgramState:
float progress = 0.9;Vec2 position = Vec2(x, y);Mat4 transform = ...;auto locOfProgress = programState->getUniformLocation("u_progress");auto locOfPosition = programState->getUniformLocation("u_position");auto locOfTransform = programState->getUniformLocation("u_transform");programState->setUniform(locOfProgress, &progress, sizof(progress));programState->setUniform(locOfPosition, &position, sizof(position));programState->setUniform(locOfTransform, &transform , sizof(transform));
你还可以将一个回调函数设置成 uniform 变量,下面是一个 lambda 表达式作为回调函数的例子:
auto locOfProgress = programState->getUniformLocation("u_progress");programState->setCallbackUniform(locOfProgress, [](ProgramState* programState, const UniformLocation &uniform){float random = CCRANDOM_0_1();programState->setUniform(uniform, &random, sizeof(random));});
虽然可以手动设置 ProgramState 对象,但更简单的方法是使用材质对象。
什么是材质
设想你想在游戏中画一个这样的球体:
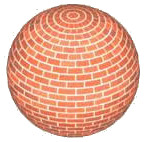
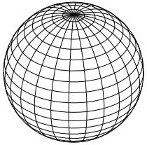
你要做的第一件事就是定义它的几何形状,像这样:
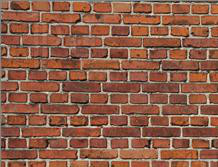
然后定义砖块纹理,像这样:
这样做也能达成目标的效果,但是如果进一步的考虑:
- 如果当球体离相机很远时,想使用质量较低的纹理呢?
- 如果想对砖块应用模糊效果呢?
- 如果想启用或者禁用球体中的照明呢?答案是使用 材质(Material),而不是使用一个简单的纹理。对于材质,你可以拥有多个纹理,还可以拥有其它的一些特性,比如多重渲染。
材质对象通过 .material 文件创建,其中包含以下信息:
- 材质有一个或多个渲染方法(technique)
- 每个渲染方法有一个或多个通道(pass)
- 每个通道有:
- 一个渲染状态(RenderState)
- 一个包含了 uniform 变量的着色器例如,这是一个材质文件:
// A "Material" file can contain one or more materialsmaterial spaceship{// A Material contains one or more Techniques.// In case more than one Technique is present, the first one will be the default one// A "Technique" describes how the material is going to be renderer// Techniques could:// - define the render quality of the model: high quality, low quality, etc.// - lit or unlit an object// etc...technique normal{// A technique can contain one or more passes// A "Pass" describes the "draws" that will be needed// in order to achieve the desired technique// The 3 properties of the Passes are shader, renderState and samplerpass 0{// shader: responsible for the vertex and frag shaders, and its uniformsshader{vertexShader = Shaders3D/3d_position_tex.vertfragmentShader = Shaders3D/3d_color_tex.frag// uniforms, including samplers go hereu_color = 0.9,0.8,0.7// sampler: the id is the uniform namesampler u_sampler0{path = Sprite3DTest/boss.pngmipmap = truewrapS = CLAMPwrapT = CLAMPminFilter = NEAREST_MIPMAP_LINEARmagFilter = LINEAR}}// renderState: responsible for depth buffer, cullface, stencil, blending, etc.renderState{cullFace = truecullFaceSide = FRONTdepthTest = true}}}}
将一个材质设置到 Sprite3D 的方法:
Material* material = Material::createWithFilename("Materials/3d_effects.material");sprite3d->setMaterial(material);
如果你想改变不同的渲染方法,你可以这样做:
material->setTechnique("normal");
渲染方法(Technique)
你只能为一个 Sprite3D 绑定一个材质,但这并不意味着固定了一种渲染方式。材质(Material)有一个特性:允许包含多个 渲染方法(Technique),当一个材质被加载时,所有的渲染方法也都被提前加载。有了这个特性,你就可以在运行时方便快速的改变一个对象的渲染效果。
通过使用 Material::setTechnique(const std::string& name) 函数,就可以完成渲染方法的切换。这种特性可以用来处理不同灯光的变换,也可以用来处理,在渲染的对象离相机很远时采用质量较低的纹理这种情景。
通道(Pass)
一个渲染方法可以有多个渲染 通道(Pass),其中一个通道对应一次渲染,多通道意味着对一个对象渲染多次,这被称为多通道渲染,也叫多重渲染。每个通道有两个主要的对象:
RenderState:包含 GPU 状态信息,如 depthTest, cullFace, stencilTest,等ProgramState:包含要使用的着色器,和一些 uniform 变量
材质文件格式
Cocos2d-x 的材质文件使用一种优化过的文件格式,同时与其它一些开源引擎的材质文件格式类似,如 GamePlay3D,OGRE3D。
注意点:
- 材质文件的扩展名无关紧要,建议使用 .material 作为扩展名
- 顶点着色器和像素着色器的文件扩展名也无关紧要,建议使用 .vert 和 .frag
- id 是材质(Meterial),渲染方法(technique),通道(pass)的可选属性
- 材质可以通过设置 parent_material_id 继承其它材质的值
// When the .material file contains one materialsprite3D->setMaterial("Materials/box.material");// When the .material file contains multiple materialssprite3D->setMaterial("Materials/circle.material#wood");
字段定义
| materialmaterial_id : parent_material_id | ||
| { | ||
| renderState {} | [0..1] | block |
| technique id {} | [0..*] | block |
| } |
| techniquetechnique_id | ||
| { | ||
| renderState {} | [0..1] | block |
| pass id {} | [0..*] | block |
| } |
| pass pass_id | ||
| { | ||
| renderState {} | [0..1] | block |
| shader {} | [0..1] | block |
| } |
| renderState | ||
| { | ||
| blend = false | [0..1] | bool |
| blendSrc = BLEND_ENUM | [0..1] | enum |
| blendDst = BLEND_ENUM | [0..1] | enum |
| cullFace = false | [0..1] | bool |
| depthTest = false | [0..1] | bool |
| depthWrite = false | [0..1] | bool |
| } | ||
| frontFace = CW | CCW | [0..1] | enum |
| depthTest = false | [0..1] | bool |
| depthWrite = false | [0..1] | bool |
| depthFunc = FUNC_ENUM | [0..1] | enum |
| stencilTest = false | [0..1] | bool |
| stencilWrite = 4294967295 | [0..1] | uint |
| stencilFunc = FUNC_ENUM | [0..1] | enum |
| stencilFuncRef = 0 | [0..1] | int |
| stencilFuncMask = 4294967295 | [0..1] | uint |
| stencilOpSfail = STENCIL_OPERATION_ENUM | [0..1] | enum |
| stencilOpDpfail = STENCIL_OPERATION_ENUM | [0..1] | enum |
| stencilOpDppass = STENCIL_OPERATION_ENUM | [0..1] | enum |
| shadershader_id | ||
| { | ||
| vertexShader = res/colored.vert | [0..1] | file path |
| fragmentShader = res/colored.frag | [0..1] | file path |
| defines = semicolon separated list | [0..1] | string |
| uniform_name =scalar | vector | [0..] | uniform |
| uniform_name = AUTO_BIND_ENUM | [0..] | enum |
| sampler uniform_name {} | [0..*] | block |
| } |
| sampleruniform_name | ||
| { | ||
| path = res/wood.png | @wood | [0..1] | image path |
| mipmap = bool | [0..1] | bool |
| wrapS = REPEAT | CLAMP | [0..1] | enum |
| wrapT = REPEAT | CLAMP | [0..1] | enum |
| minFilter = TEXTURE_MIN_FILTER_ENUM | [0..1] | enum |
| magFilter = TEXTURE_MAG_FILTER_ENUM | [0..1] | enum |
| } |
枚举类型定义
| TEXTURE_MIN_FILTER_ENUM | |
|---|---|
| NEAREST | Lowest quality non-mipmapped |
| LINEAR | Better quality non-mipmapped |
| NEAREST_MIPMAP_NEAREST | Fast but low quality mipmapping |
| LINEAR_MIPMAP_NEAREST | |
| NEAREST_MIPMAP_LINEAR | |
| LINEAR_MIPMAP_LINEAR | Best quality mipmapping |
| TEXTURE_MAG_FILTER_ENUM | |
|---|---|
| NEAREST | Lowest quality |
| LINEAR | Better quality |
| BLEND_ENUM | |
|---|---|
| ZERO | ONE_MINUS_DST_ALPHA |
| ONE | CONSTANT_ALPHA |
| SRC_ALPHA | ONE_MINUS_CONSTANT_ALPHA |
| ONE_MINUS_SRC_ALPHA | SRC_ALPHA_SATURATE |
| DST_ALPHA |
| CULL_FACE_SIDE_ENUM | |
|---|---|
| BACK | Cull back-facing polygons. |
| FRONT | Cull front-facing polygons. |
| FRONT_AND_BACK | Cull front and back-facing polygons. |
| FUNC_ENUM | |
|---|---|
| NEVER | ALWAYS |
| LESS | GREATER |
| EQUAL | NOTEQUAL |
| LEQUAL | GEQUAL |
| STENCIL_OPERATION_ENUM | |
|---|---|
| KEEP | REPLACE |
| ZERO | INVERT |
| INCR | DECR |
| INCR_WRAP | DECR_WRAP |
数据类型:
- scalar 代表标量,可以用浮点型(float),整形(int),布尔型(bool)
- vector 代表矢量,用逗号分隔的一系列浮点数表示
内建 uniform 变量名
下面是 Cocos2d-x 内部使用的一些 uniform 变量,你可以在自定义的着色器中使用它们。
u_PMatrix: Amat4with the projection matrixu_MVMatrix: Amat4with the Model View matrixu_MVPMatrix: Amat4with the Model View Projection matrixu_NormalMatrix: Amat4with Normal Matrixu_Time: avec4with the elapsed time since the game was started- u_Time[0] = time / 10;
- u_Time[1] = time;
- u_Time[2] = time * 2;
- u_Time[3] = time * 4;
u_SinTime: avec4with the elapsed time since the game was started:- u_SinTime[0] = time / 8;
- u_SinTime[1] = time / 4;
- u_SinTime[2] = time / 2;
- u_SinTime[3] = sinf(time);
u_CosTime: avec4with the elapsed time since the game was started:- u_CosTime[0] = time / 8;
- u_CosTime[1] = time / 4;
- u_CosTime[2] = time / 2;
- u_CosTime[3] = cosf(time);
u_Random01: Avec4with four random numbers between 0.0f and 1.0fu_texture: Asampler2Du_texture1: Asampler2D
