 我的书签
我的书签
 添加书签
添加书签 移除书签
移除书签- Nginx 安装和配置
- Nginx 说明
- 来自网络上的一个好介绍
- Nginx 源码编译安装
- 把 Nginx 添加到系统服务中
- Nginx 全局变量
- Nginx 配置
- Nginx 在 1.8.1 版本下的默认配置(去掉注释)
- HTTP 服务,虚拟主机
- 反向代理和负载均衡
- 配置 HTTPS 服务(SSL 证书配置)
- Nginx 配置文件常用配置积累
- location 配置
- HTTP 服务,绑定多个域名
- 安装第三方模块
- 生成规格图
- 启用 Gzip 压缩
- 防盗链
- Nginx 禁止特定用户代理(User Agents)访问,静止指定 IP 访问
- Nginx 缓存
- Nginx 自动分割日志文件
- Nginx 处理跨域请求
- 安全相预防
- 使用 logrotate 做 nginx 日志轮询分割
- 杂七杂八
- 资料
Nginx 安装和配置
Nginx 说明
- Nginx 是一个很强大的高性能 Web 和反向代理服务器,常被我们用作负载均衡服务器,也可以作为邮件代理服务器
- Nginx WIKI:https://zh.wikipedia.org/zh/Nginx
- Nginx 百科:http://baike.baidu.com/item/nginx
- Nginx 官网:http://nginx.org/en/
- Nginx 官网下载:http://nginx.org/en/download.html
- 源码包方式下载:http://nginx.org/en/download.html,注意该页面的:
Stable version,这个表示稳定版本,2016-03-22 最新版本是:nginx-1.8.1,这是一个 tar.gz 的文件链接。 - 构建包方式下载:http://nginx.org/en/linux_packages.html#stable
- 源码包方式下载:http://nginx.org/en/download.html,注意该页面的:
- Nginx 文档:
- 优先:https://www.nginx.com/resources/wiki/
- 次要:http://nginx.org/en/docs/
- Nginx 模块地址:https://www.nginx.com/resources/wiki/modules/
来自网络上的一个好介绍
- 来源:https://help.aliyun.com/knowledge_detail/6703521.html?spm=5176.788314854.2.2.CdMGlB
- 传统上基于进程或线程模型架构的 Web 服务通过每进程或每线程处理并发连接请求,这势必会在网络和 I/O 操作时产生阻塞,其另一个必然结果则是对内存或 CPU 的利用率低下。生成一个新的进程/线程需要事先备好其运行时环境,这包括为其分配堆内存和栈内存,以及为其创建新的执行上下文等。这些操作都需要占用 CPU,而且过多的进程/线程还会带来线程抖动或频繁的上下文切换,系统性能也会由此进一步下降。
- 在设计的最初阶段,Nginx 的主要着眼点就是其高性能以及对物理计算资源的高密度利用,因此其采用了不同的架构模型。受启发于多种操作系统设计中基于“事件”的高级处理机制,nginx采用了模块化、事件驱动、异步、单线程及非阻塞的架构,并大量采用了多路复用及事件通知机制。在 Nginx 中,连接请求由为数不多的几个仅包含一个线程的进程 Worker 以高效的回环(run-loop)机制进行处理,而每个 Worker 可以并行处理数千个的并发连接及请求。
- 如果负载以 CPU 密集型应用为主,如 SSL 或压缩应用,则 Worker 数应与 CPU 数相同;如果负载以 IO 密集型为主,如响应大量内容给客户端,则 Worker 数应该为 CPU 个数的 1.5 或 2 倍。
- Nginx会按需同时运行多个进程:一个主进程(Master)和几个工作进程(Worker),配置了缓存时还会有缓存加载器进程(Cache Loader)和缓存管理器进程(Cache Manager)等。所有进程均是仅含有一个线程,并主要通过“共享内存”的机制实现进程间通信。主进程以root用户身份运行,而 Worker、Cache Loader 和 Cache manager 均应以非特权用户身份运行。
- 主进程主要完成如下工作:
- 1.读取并验正配置信息;
- 2.创建、绑定及关闭套接字;
- 3.启动、终止及维护worker进程的个数;
- 4.无须中止服务而重新配置工作特性;
- 5.控制非中断式程序升级,启用新的二进制程序并在需要时回滚至老版本;
- 6.重新打开日志文件,实现日志滚动;
- 7.编译嵌入式perl脚本;
- Worker 进程主要完成的任务包括:
- 1.接收、传入并处理来自客户端的连接;
- 2.提供反向代理及过滤功能;
- 3.nginx任何能完成的其它任务;
- Cache Loader 进程主要完成的任务包括:
- 1.检查缓存存储中的缓存对象;
- 2.使用缓存元数据建立内存数据库;
- Cache Manager 进程的主要任务:
- 1.缓存的失效及过期检验;
Nginx 源码编译安装
- 官网下载最新稳定版本 1.8.1,大小:814K
- 官网安装说明:https://www.nginx.com/resources/wiki/start/topics/tutorials/install/
- 源码编译配置参数说明:
- https://www.nginx.com/resources/wiki/start/topics/tutorials/installoptions/
- http://nginx.org/en/docs/configure.html
开始安装:
- 安装依赖包:
yum install -y gcc gcc-c++ pcre pcre-devel zlib zlib-devel openssl openssl-devel - 预设几个文件夹,方便等下安装的时候有些文件可以进行存放:
mkdir -p /usr/local/nginx /var/log/nginx /var/temp/nginx /var/lock/nginx
- 下载源码包:
wget http://nginx.org/download/nginx-1.8.1.tar.gz - 解压:
tar zxvf nginx-1.8.1.tar.gz - 进入解压后目录:
cd nginx-1.8.1/ 编译配置:
./configure \--prefix=/usr/local/nginx \--pid-path=/var/local/nginx/nginx.pid \--lock-path=/var/lock/nginx/nginx.lock \--error-log-path=/var/log/nginx/error.log \--http-log-path=/var/log/nginx/access.log \--with-http_gzip_static_module \--http-client-body-temp-path=/var/temp/nginx/client \--http-proxy-temp-path=/var/temp/nginx/proxy \--http-fastcgi-temp-path=/var/temp/nginx/fastcgi \--http-uwsgi-temp-path=/var/temp/nginx/uwsgi \--with-http_ssl_module \--http-scgi-temp-path=/var/temp/nginx/scgi
编译:
make- 安装:
make install
- 安装依赖包:
启动 Nginx
先检查是否在 /usr/local 目录下生成了 Nginx 等相关文件:
cd /usr/local/nginx;ll,正常的效果应该是显示这样的:drwxr-xr-x. 2 root root 4096 3月 22 16:21 confdrwxr-xr-x. 2 root root 4096 3月 22 16:21 htmldrwxr-xr-x. 2 root root 4096 3月 22 16:21 sbin
停止防火墙:
service iptables stop- 或是把 80 端口加入到的排除列表:
sudo iptables -A INPUT -p tcp -m tcp --dport 80 -j ACCEPTsudo service iptables savesudo service iptables restart
- 启动:
/usr/local/nginx/sbin/nginx,启动完成 shell 是不会有输出的 - 检查 时候有 Nginx 进程:
ps aux | grep nginx,正常是显示 3 个结果出来 - 检查 Nginx 是否启动并监听了 80 端口:
netstat -ntulp | grep 80 - 访问:
192.168.1.114,如果能看到:Welcome to nginx!,即可表示安装成功 - 检查 Nginx 启用的配置文件是哪个:
/usr/local/nginx/sbin/nginx -t - 刷新 Nginx 配置后重启:
/usr/local/nginx/sbin/nginx -s reload - 停止 Nginx:
/usr/local/nginx/sbin/nginx -s stop - 如果访问不了,或是出现其他信息看下错误立即:
vim /var/log/nginx/error.log
把 Nginx 添加到系统服务中
- 新建文件:
vim /etc/init.d/nginx - 添加如下内容:
#!/bin/bash#nginx执行程序路径需要修改nginxd=/usr/local/nginx/sbin/nginx# nginx配置文件路径需要修改nginx_config=/usr/local/nginx/conf/nginx.conf# pid 地址需要修改nginx_pid=/var/local/nginx/nginx.pidRETVAL=0prog="nginx"# Source function library.. /etc/rc.d/init.d/functions# Source networking configuration.. /etc/sysconfig/network# Check that networking is up.[ ${NETWORKING} = "no" ] && exit 0[ -x $nginxd ] || exit 0# Start nginx daemons functions.start() {if [ -e $nginx_pid ];thenecho "nginx already running...."exit 1fiecho -n $"Starting $prog: "daemon $nginxd -c ${nginx_config}RETVAL=$?echo[ $RETVAL = 0 ] && touch /var/lock/subsys/nginxreturn $RETVAL}# Stop nginx daemons functions.# pid 地址需要修改stop() {echo -n $"Stopping $prog: "killproc $nginxdRETVAL=$?echo[ $RETVAL = 0 ] && rm -f /var/lock/subsys/nginx /var/local/nginx/nginx.pid}# reload nginx service functions.reload() {echo -n $"Reloading $prog: "#kill -HUP `cat ${nginx_pid}`killproc $nginxd -HUPRETVAL=$?echo}# See how we were called.case "$1" instart)start;;stop)stop;;reload)reload;;restart)stopstart;;status)status $progRETVAL=$?;;*)echo $"Usage: $prog {start|stop|restart|reload|status|help}"exit 1esacexit $RETVAL
- 修改权限:
chmod 755 /etc/init.d/nginx - 启动服务:
service nginx start - 停止服务:
service nginx stop - 重启服务:
service nginx restart
Nginx 全局变量
- $arg_PARAMETER #这个变量包含GET请求中,如果有变量PARAMETER时的值。
- $args #这个变量等于请求行中(GET请求)的参数,例如foo=123&bar=blahblah;
- $binary_remote_addr #二进制的客户地址。
- $body_bytes_sent #响应时送出的body字节数数量。即使连接中断,这个数据也是精确的。
- $content_length #请求头中的Content-length字段。
- $content_type #请求头中的Content-Type字段。
- $cookie_COOKIE #cookie COOKIE变量的值
- $document_root #当前请求在root指令中指定的值。
- $document_uri #与$uri相同。
- $host #请求主机头字段,否则为服务器名称。
- $hostname #Set to the machine’s hostname as returned by gethostname
- $http_HEADER
- $is_args #如果有$args参数,这个变量等于”?”,否则等于””,空值。
- $http_user_agent #客户端agent信息
- $http_cookie #客户端cookie信息
- $limit_rate #这个变量可以限制连接速率。
- $query_string #与$args相同。
- $request_body_file #客户端请求主体信息的临时文件名。
- $request_method #客户端请求的动作,通常为GET或POST。
- $remote_addr #客户端的IP地址。
- $remote_port #客户端的端口。
- $remote_user #已经经过Auth Basic Module验证的用户名。
- $request_completion #如果请求结束,设置为OK. 当请求未结束或如果该请求不是请求链串的最后一个时,为空(Empty)。
- $request_method #GET或POST
- $request_filename #当前请求的文件路径,由root或alias指令与URI请求生成。
- $request_uri #包含请求参数的原始URI,不包含主机名,如:”/foo/bar.php?arg=baz”。不能修改。
- $scheme #HTTP方法(如http,https)。
- $server_protocol #请求使用的协议,通常是HTTP/1.0或HTTP/1.1。
- $server_addr #服务器地址,在完成一次系统调用后可以确定这个值。
- $server_name #服务器名称。
- $server_port #请求到达服务器的端口号。
- $uri #不带请求参数的当前URI,$uri不包含主机名,如”/foo/bar.html”。该值有可能和$request_uri 不一致。
- $request_uri是浏览器发过来的值。该值是rewrite后的值。例如做了internal redirects后。
Nginx 配置
- Nginx 默认配置文件:
vim /usr/local/nginx/conf/nginx.conf
Nginx 在 1.8.1 版本下的默认配置(去掉注释)
user root;#我这里习惯使用 root,所以这里需要这样设置。如果你有为你的 nginx 专门配置一个用户,这里需要改为你的用户worker_processes 1;events {worker_connections 1024;}http {include mime.types;default_type application/octet-stream;sendfile on;keepalive_timeout 65;server {listen 80;server_name localhost;location / {root html;index index.html index.htm;}error_page 500 502 503 504 /50x.html;location = /50x.html {root html;}}}
HTTP 服务,虚拟主机
- 停止防火墙:
service iptables stop,防止出现特别干扰 - 编辑默认的配置文件:
vim /usr/local/nginx/conf/nginx.conf - 设置两个虚拟主机(通过端口来区分开)
user root;#我这里习惯使用 root,所以这里需要这样设置。如果你有为你的 nginx 专门配置一个用户,这里需要改为你的用户worker_processes 1;events {worker_connections 1024;}http {include mime.types;default_type application/octet-stream;sendfile on;keepalive_timeout 65;# 一个 server 代表一个虚拟主机server {listen 80;server_name localhost;location / {# 虚拟机根目录是 /usr/local/nginx/html 目录root html;# 虚拟机首页是 /usr/local/nginx/html 目录下这两个文件index index.html index.htm;}error_page 500 502 503 504 /50x.html;location = /50x.html {root html;}}server {# 第二个虚拟机的端口是 90,服务地址还是本地listen 90;server_name localhost;location / {root html90;index index.html index.htm;}error_page 500 502 503 504 /50x.html;location = /50x.html {root html;}}}
- 设置两个虚拟主机(通过域名来区分开)
user root;#我这里习惯使用 root,所以这里需要这样设置。如果你有为你的 nginx 专门配置一个用户,这里需要改为你的用户worker_processes 1;events {worker_connections 1024;}http {include mime.types;default_type application/octet-stream;sendfile on;keepalive_timeout 65;# 一个 server 代表一个虚拟主机server {listen 80;# 两个虚拟主机都使用 80 端口,设置不同域名server_name code.youmeek.com;location / {# 虚拟机根目录是 /usr/local/nginx/html 目录root html;# 虚拟机首页是 /usr/local/nginx/html 目录下这两个文件index index.html index.htm;}error_page 500 502 503 504 /50x.html;location = /50x.html {root html;}}server {listen 80;# 两个虚拟主机都使用 80 端口,设置不同域名server_name i.youmeek.com;location / {root html-i;index index.html index.htm;}error_page 500 502 503 504 /50x.html;location = /50x.html {root html;}}}
反向代理和负载均衡
最精简的环境:一台虚拟机
- 1 个 JDK
- 1 个 Nginx
- 2 个 Tomcat
Nginx 配置:
user root;#我这里习惯使用 root,所以这里需要这样设置。如果你有为你的 nginx 专门配置一个用户,这里需要改为你的用户worker_processes 1;events {worker_connections 1024;}http {include mime.types;default_type application/octet-stream;sendfile on;keepalive_timeout 65;# 自己定义的两个 tomcat 请求地址和端口# 也就是当浏览器请求:tomcat.youmeek.com 的时候从下面这两个 tomcat 中去找一个进行转发upstream tomcatCluster {server 192.168.1.114:8080;server 192.168.1.114:8081;# 添加 weight 字段可以表示权重,值越高权重越大,默认值是 1,最大值官网没说,一般如果设置也就设置 3,5,7 这样的数# 官网:https://www.nginx.com/resources/admin-guide/load-balancer/#weight# server 192.168.1.114:8080 weight=2;# server 192.168.1.114:8081 weight=1;}server {listen 80;server_name tomcat.youmeek.com;location / {proxy_pass http://tomcatCluster;index index.html index.htm;}}}
配置 HTTPS 服务(SSL 证书配置)
- 免费申请 SSL 证书渠道
- 教程:https://www.wn789.com/4394.html
- SSL For Free:https://www.sslforfree.com
- 配置要点其实就是下面该图:
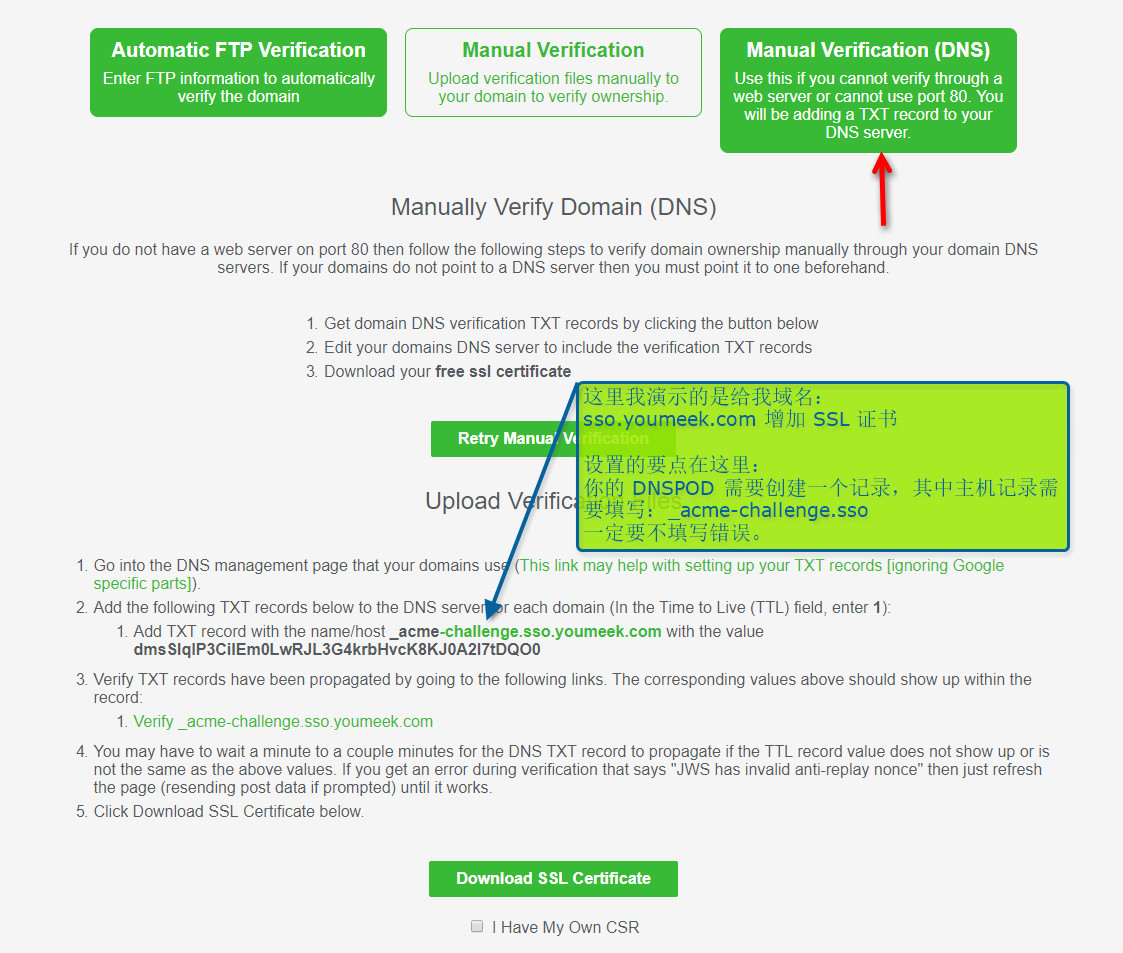
- 一般你会下载下面两个文件:
certificate.crt,private.key - 如果你需要把 crt 和 key 的证书转换成 keystore(如果你有这个需求的话)
- 从 key 和 crt 生成 pkcs12 格式的 keystore,生成过程会让人你输入密码,这个密码下面会用到,我这里假设输入 123456
openssl pkcs12 -export -in certificate.crt -inkey private.key -out youmeek.p12 -name youmeek -CAfile certificate.crt -caname -chainkeytool -importkeystore -v -srckeystore youmeek.p12 -srcstoretype pkcs12 -srcstorepass 123456 -destkeystore youmeek.keystore -deststoretype jks -deststorepass 123456
- 修改 nginx 配置文件,增加对 HTTPS 支持(下面的配置是基于默认安装 nginx 后的配置)
vim /usr/local/nginx/conf/nginx.conf
worker_processes 1;events {worker_connections 1024;}http {include mime.types;default_type application/octet-stream;sendfile on;keepalive_timeout 65;# 如果访问 http 也直接跳转到 httpsserver {listen 80;server_name sso.youmeek.com;return 301 https://$server_name$request_uri;}# crt 和 key 文件的存放位置根据你自己存放位置进行修改server {listen 443;server_name sso.youmeek.com;ssl on;ssl_certificate /opt/ssl/certificate.crt;ssl_certificate_key /opt/ssl/private.key;location / {root html;index index.html index.htm;}error_page 500 502 503 504 /50x.html;location = /50x.html {root html;}}}
Nginx 配置文件常用配置积累
location 配置
= 开头表示精确匹配^~ 开头表示uri以某个常规字符串开头,不是正则匹配~ 开头表示区分大小写的正则匹配;~* 开头表示不区分大小写的正则匹配/ 通用匹配, 如果没有其它匹配,任何请求都会匹配到location / {}location /user {}location = /user {}location /user/ {}location ^~ /user/ {}location /user/youmeek {}location ~ /user/youmeek {}location ~ ^(/cas/|/casclient1/|/casclient2/|/casclient3/) {}location ~ .*\.(gif|jpg|jpeg|png|bmp|swf|ico|woff|woff2|ttf|eot|txt)$ {}location ~ .*$ {}
HTTP 服务,绑定多个域名
- https://www.ttlsa.com/nginx/use-nginx-proxy/
安装第三方模块
生成规格图
启用 Gzip 压缩
防盗链
- https://help.aliyun.com/knowledge_detail/5974693.html?spm=5176.788314853.2.18.s4z1ra
Nginx 禁止特定用户代理(User Agents)访问,静止指定 IP 访问
- https://www.ttlsa.com/nginx/how-to-block-user-agents-using-nginx/
- https://help.aliyun.com/knowledge_detail/5974693.html?spm=5176.788314853.2.18.s4z1ra
- <>
- <>
- <>
Nginx 缓存
Nginx 自动分割日志文件
Nginx 处理跨域请求
安全相预防
在配置文件中设置自定义缓存以限制缓冲区溢出攻击的可能性
client_body_buffer_size 1K;
client_header_buffer_size 1k;
client_max_body_size 1k;
large_client_header_buffers 2 1k;
- 将timeout设低来防止DOS攻击
所有这些声明都可以放到主配置文件中。
client_body_timeout 10;
client_header_timeout 10;
keepalive_timeout 5 5;
send_timeout 10;
- 限制用户连接数来预防DOS攻击
limit_zone slimits $binary_remote_addr 5m;
limit_conn slimits 5;
使用 logrotate 做 nginx 日志轮询分割
前提:
- 我 nginx 的成功日志路径:/var/log/nginx/access.log
- 我 nginx 的错误日志路径:/var/log/nginx/error.log
- pid 路径:/var/local/nginx/nginx.pid
一般情况 CentOS 是装有:logrotate,你可以检查下:
rpm -ql logrotate,如果有相应结果,则表示你也装了。logrotate 配置文件一般在:
- 全局配置:/etc/logrotate.conf 通用配置文件,可以定义全局默认使用的选项。
- 自定义配置,放在这个目录下的都算是:/etc/logrotate.d/
针对 nginx 创建自定义的配置文件:
vim /etc/logrotate.d/nginx- 文件内容如下:
/var/log/nginx/access.log /var/log/nginx/error.log {create 644 root rootnotifemptydailyrotate 15missingokdateextsharedscriptspostrotateif [ -f /var/local/nginx/nginx.pid ]; thenkill -USR1 `cat /var/local/nginx/nginx.pid`fiendscript}
- /var/log/nginx/access.log /var/log/nginx/error.log:多个文件用空格隔开,也可以用匹配符:/var/log/nginx/*.log
- notifempty:如果是空文件的话,不转储
- create 644 root root:create mode owner group 转储文件,使用指定的文件模式创建新的日志文件
- 调用频率,有:daily,weekly,monthly可选
- rotate 15:一次将存储15个归档日志。对于第16个归档,时间最久的归档将被删除。
- sharedscripts:所有的日志文件都轮转完毕后统一执行一次脚本
- missingok:如果日志文件丢失,不报错继续执行下一个
- dateext:文件后缀是日期格式,也就是切割后文件是:xxx.log-20131216.gz 这样,如果注释掉,切割出来是按数字递增,即前面说的 xxx.log-1 这种格式
- postrotate:执行命令的开始标志
- endscripthttp:执行命令的结束标志
- if 判断的意思不是中止Nginx的进程,而是传递给它信号重新生成日志,如果nginx没启动不做操作
- 更多参数可以看:http://www.cnblogs.com/zengkefu/p/5498324.html
- 手动执行测试:
/usr/sbin/logrotate -vf /etc/logrotate.d/nginx - 参数:‘-f’选项来强制logrotate轮循日志文件,‘-v’参数提供了详细的输出。
- 验证是否手动执行成功,查看 cron 的日志即可:
grep logrotate /var/log/cron - 设置 crontab 定时任务:
vim /etc/crontab,添加下面内容:
//每天02点10分执行一次10 02 * * * /usr/sbin/logrotate -f /etc/logrotate.d/nginx
杂七杂八
- nginx实现简体繁体字互转以及中文转拼音
- nginx记录分析网站响应慢的请求(ngx_http_log_request_speed)
- nginx空白图片(empty_gif模块)
资料
- https://help.aliyun.com/knowledge_detail/5974693.html?spm=5176.788314853.2.18.s4z1ra
- http://www.ydcss.com/archives/466
- http://blog.sae.sina.com.cn/archives/2107
- http://www.nginx.cn/273.html
