 我的书签
我的书签
 添加书签
添加书签 移除书签
移除书签- 添加代码高亮(Adding Language Colorization)
- 从扩展市场添加新语言(Adding Colorizers from the Marketplace)
- 添加一种新语言(Adding a New Language)
- 将语言支持发布到扩展市场(Publishing Language Support to the Extension Marketplace)
- 添加到你的语言支持扩展(Add to your Language Support Extension)
- 接下来(Next Steps)
- Common Questions
添加代码高亮(Adding Language Colorization)
VS Code includes support for many languages in the box giving great syntax highlighting (colorization), bracket matching and more. You and the community can also add new languages to VS Code. This topic explains how to install new languages from the Extension Marketplace as well as create your own.
VS Code 支持许多语言,提供了不错的语法高亮(着色),括号匹配等。您和社区还可以向VS Code添加新语言。本文将介绍如何从扩展市场安装新语言以及创建自己的语言。
从扩展市场添加新语言(Adding Colorizers from the Marketplace)
Many language colorizers have been uploaded to the VS Code Extension Marketplace by the community. If you find one you want to use, simply install it and restart VS Code and the new language will be available.
许多语言代码高亮插件已经被社区上传到 VS Code 扩展市场。如果你发现了你想要使用的语言,你只需安装它,并重新启动VS Code,新语言将被支持。
Tip: To search for language support for a specific language, type the language name in the
Extension: Install Extensiondropdown to filter the available extensions.提示: 要搜索特定语言的语言支持,
请在扩展:安装扩展下拉菜单中键入语言名称,以筛选可用的扩展。

You can also browse the VS Code Marketplace site directly to find available colorizers and language support.
您还可以直接浏览VS Code 扩展市场网站,以查找可用的代码高亮和语言支持。
添加一种新语言(Adding a New Language)
Using the ‘code’ Yeoman generator, you can add TextMate language specification files (.tmLanguage) to your VS Code installation to get syntax highlighting and bracket matching.
使用‘code’Yeoman生成器,您可以添加TextMate语言规范文件(.tmLanguage)到您的VS Code 并安装以获得语法高亮和括号匹配。
A good place to look for existing TextMate .tmLanguage files is on GitHub. Search for a TextMate bundle for the language you are interested in and then navigate to the Syntaxes folder. The ‘code’ Yeoman generator can handle either .tmLanguage or .plist files. When prompted for the URL or file location, pass the raw path to the .tmLanguage file e.g. http://raw.githubusercontent.com/textmate/ant.tmbundle/master/Syntaxes/Ant.tmLanguage.
GitHub是查找现有TextMate .tmLanguage文件的好地方。搜索您感兴趣语言的TextMate包,然后导航到 语法文件夹。 ‘code’Yeoman生成器可以处理.tmLanguage或.plist文件。当提示输入URL或文件位置时,将原始路径传递到.tmLanguage文件,例如:http://raw.githubusercontent.com/textmate/ant.tmbundle/master/Syntaxes/Ant.tmLanguage.

The generator will prompt you for other information such a unique name (this should be unique to avoid clashing with other extensions) and the language name, aliases and file extensions.
生成器将提示您提供其他信息,例如唯一名称(这应该是唯一的,以避免与其他扩展名冲突)和语言名称,别名和文件扩展名。
When the generator is finished, open the created folder in Visual Studio Code. Have a look at the generated <languageid>.configuration.json file: It contains more language settings such as the tokens used for comments and brackets. Make sure the configurations are accurate. The generated vsc-extension-quickstart.md file also contains more information on how to run and debug your extension.
当生成完成后,在Visual Studio Code 中打开创建的文件夹。查看生成的 <languageid> .configuration.json 文件:它包含更多的语言设置,例如用于注释和括号的标记。确保配置准确。生成的 vsc-extension-quickstart.md 文件还包含有关如何运行和调试扩展的更多信息。
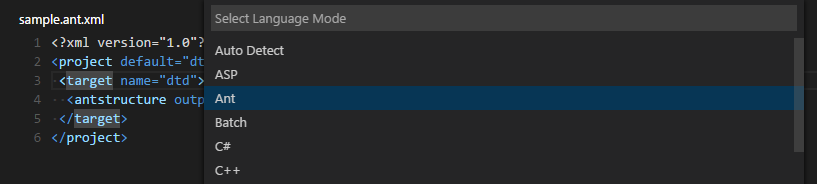
To use your extension in your stable VS Code installation, copy the complete output folder to a new folder under your .vscode/extensions folder and restart VS Code. When you restart VS Code, your new language will be visible in the language specifier dropdown and you’ll get full colorization and bracket/tag matching for files matching the language’s file extension.
要想在您的VS Code中使用您的扩展,请将完整的输出文件夹复制到.vscode/extensions文件夹下的新文件夹,然后重新启动VS Code。当您重新启动VS Code时,您的新语言将显示在语言说明符下拉列表中,您将获得与语言文件扩展名匹配的文件的完全代码高亮和括号/标记匹配。
将语言支持发布到扩展市场(Publishing Language Support to the Extension Marketplace)
If you’d like to share your new language with the community, you can publish it to the Extension Marketplace. Use the vsce publishing tool to package your extension and publish it to the VS Code Marketplace.
如果您想在社区分享您的新语言支持,可以将其发布到扩展程序市场。使用vsce发布工具打包您的扩展,并将其发布到VS Code 扩展市场。
Tip: To make it easy for users to find your language support, include the language name and words “language” or “language support” in the extension description and set the
CategorytoLanguagesin yourpackage.json.提示: 为了方便用户找到您的语言支持,请在扩展说明中包含语言名称和相关说明,如:“语言”或“语言支持”,并在
package.json中将Category设置为Languages。
We also have recommendations on how to make your extension look great on the VS Code Marketplace, see Marketplace Presentation Tips.
我们还有一些建议使您写的插件广受欢迎,请参阅市场演示提示。
添加到你的语言支持扩展(Add to your Language Support Extension)
When you’re adding a new language to VS Code, it is also great to add language snippets to support common editing actions. It is easy to combine multiple extensions like snippets and colorizers into the same extension. You can modify the colorizer extension manifest package.json to include a snippets contribution and the snippets.json.
当您向VS Code添加新语言时,添加语言片段以支持常见的编辑操作也非常友好。很容易将多个扩展程序(如代码段和代码高亮)合并到同一扩展中。您可以修改 colorizer扩展清单 package.json 以包括片段贡献和 snippets.json。
{"name": "language-latex","description": "LaTeX Language Support","version": "0.0.1","publisher": "someone","engines": {"vscode": "0.10.x"},"categories": ["Languages","Snippets"],"contributes": {"languages": [{"id": "latex","aliases": ["LaTeX", "latex"],"extensions": [".tex"]}],"grammars": [{"language": "latex","scopeName": "text.tex.latex","path": "./syntaxes/latex.tmLanguage"}],"snippets": [{"language": "latex","path": "./snippets/snippets.json"}]}}
接下来(Next Steps)
Colorizers are just one way to customize VS Code, If you’d like to learn more about VS Code extensibility, try these topics:
定制化代码高亮只是一种自定义VS Code的方法,如果你想了解更多关于VS Code可扩展性,请阅读下面的文章:
- Snippets - Learn how to also include snippets in your language extension.
- Custom themes - Learn how to import existing TextMate themes.
Extending Visual Studio Code - Learn about other ways to extend VS Code
Snippets - 了解如何在您的语言扩展中包含代码段。
- Custom themes - 了解如何导入现有的TextMate主题。
- Extending Visual Studio Code - 了解其他扩展VS代码的方法。
Common Questions
Q: Can I add more file extensions to my colorizer?
A: Yes, the yo code generator provides the default file extensions from the .tmLanguage file but you can easily add more file extensions to a languages contribution extensions array. In the example below, the .asp file extension has been added to the default .asa file extension.
{"name": "asp","version": "0.0.1","engines": {"vscode": "0.10.x"},"publisher": "none","contributes": {"languages": [{"id": "asp","aliases": ["ASP", "asp"],"extensions": [".asa", ".asp"]}],"grammars": [{"language": "asp","scopeName": "source.asp","path": "./syntaxes/asp.tmLanguage"}]}}
Q: Can I add more file extensions to an existing colorizer?
A: Yes. To extend an existing colorizer, you would create a simple package.json in a new folder under .vscode/extensions and provide the extensionDependencies attribute specifying the customization you want to add to. In the example below, an extension .mmd is added to the markdown colorizer. Note that not only must the extensionDependency name match the customization but also the language id must match the language id of the colorizer you are extending.
{"name": "MyMarkdown","version": "0.0.1","engines": {"vscode": "0.10.x"},"publisher": "none","extensionDependencies": ["markdown"],"contributes": {"languages": [{"id": "markdown","aliases": ["mmd"],"extensions": [".mmd"]}]}}
Q: What if I want to completely override an existing colorizer?
A: Yes and no. If the colorizer is implemented as a customization then yes but some of VS Code’s built-in colorizers (e.g. Markdown) are integrated differently and cannot be overridden. You override the colorizer by using the extensionDependencies attribute as above and providing a new grammars element.
{"name": "override-xml","version": "0.0.1","engines": {"vscode": "0.10.x"},"publisher": "none","extensionDependencies": ["xml"],"contributes": {"grammars": [{"language": "xml","scopeName": "text.xml.ant","path": "./syntaxes/ant.tmLanguage"}]}}
