 我的书签
我的书签
 添加书签
添加书签 移除书签
移除书签- 安装启动
- 1. 安装Node
- 2. 安装whistle
- 3. 启动whistle
- 4. 配置代理
- 配置信息
- 代理配置方式(把上面配置信息配置上即可)
- 访问配置页面
安装启动
安装启动whistle,需要以下四个步骤: 安装Node、安装whistle、启动whistle、配置代理。
1. 安装Node
whistle支持v0.10.0以上版本的Node,为获取更好的性能,推荐安装最新版本的Node。
如果你的系统已经安装了v0.10.0以上版本的Node,可以忽略此步骤,直接进入安装whistle的步骤,否则:
- Windows或Mac系统,访问https://nodejs.org/,安装LTS版本的Node,默认安装即可。
- Linux下推荐使用源码安装: 从Node官网下载最新版的Source Code(或者用
wget命令下载),解压文件(tar -xzvf node-vx.y.z.tar.gz)后进入解压后的根目录(node-vx.y.z),依次执行./configure、./make和./make install。
安装完Node后,执行下面命令,查看当前Node版本
$ node -vv4.4.0
如果能正常输出Node的版本号,表示Node已安装成功(Windows系统可能需要重新打开cmd)。
2. 安装whistle
Node安装成功后,执行如下npm命令安装whistle (Mac或Linux的非root用户需要在命令行前面加sudo,如:sudo npm install -g whistle)
$ npm install -g whistle
npm默认镜像是在国外,有时候安装速度很慢或者出现安装不了的情况,如果无法安装或者安装很慢,可以使用taobao的镜像安装:
$ npm install cnpm -g --registry=https://registry.npm.taobao.org$ cnpm install -g whistle或者直接指定镜像安装:$ npm install whistle -g --registry=https://registry.npm.taobao.org
whistle安装完成后,执行命令 whistle help 或 w2 help,查看whistle的帮助信息
$ w2 helpUsage: whistle <command> [options]Commands:status Show the running status of whistleuse/add [filepath] Set rules from a specified js file (.whistle.js by default)run Start a front servicestart Start a background servicestop Stop current background servicerestart Restart current background servicehelp Display help informationOptions:-h, --help output usage information-D, --baseDir [baseDir] set the configured storage root path-z, --certDir [directory] set custom certificate store directory-l, --localUIHost [hostname] set the domain for the web ui of whistle (local.whistlejs.com by default)-L, --pluginHost [hostname] set the domain for the web ui of plugin (as: "script=a.b.com&vase=x.y.com")-n, --username [username] set the username to access the web ui of whistle-w, --password [password] set the password to access the web ui of whistle-N, --guestName [username] set the the guest name to access the web ui of whistle (can only view the data)-W, --guestPassword [password] set the guest password to access the web ui of whistle (can only view the data)-s, --sockets [number] set the max number of cached long connection on each domain (60 by default)-S, --storage [newStorageDir] set the configured storage directory-C, --copy [storageDir] copy the configuration of the specified directory to a new directory-c, --dnsCache [time] set the cache time of DNS (30000ms by default)-H, --host [boundHost] set the bound host of whistle (INADDR_ANY by default)-p, --port [proxyPort] set the proxy port of whistle (8899 by default)-P, --uiport [uiport] set the listening port of whistle webui-m, --middlewares [script path or module name] set the express middlewares loaded at startup (as: xx,yy/zz.js)-M, --mode [mode] set the way of starting the whistle mode (as: pureProxy|debug|multiEnv)-t, --timeout [ms] set the request timeout (66000ms by default)-e, --extra [extraData] set the extra parameters for plugin-f, --secureFilter [secureFilter] set the path of secure filter-R, --reqCacheSize [reqCacheSize] set the cache size of request data (600 by default)-F, --frameCacheSize [frameCacheSize] set the cache size of webSocket and socket's frames (512 by default)-A, --addon [pluginPaths] add custom plugin paths--httpPort [httpPort] set the http server port of whistle--httpsPort [httpsPort] set the https server port of whistle--no-global-plugins do not load any globally installed plugins--no-prev-options do not reuse the previous options when restarting-V, --version output the version number
如果能正常输出whistle的帮助信息,表示whistle已安装成功。
3. 启动whistle
最新版本的whistle支持三种等价的命令
whistle、w2、wproxy
启动whistle:
$ w2 start
Note: 如果要防止其他人访问配置页面,可以在启动时加上登录用户名和密码 -n yourusername -w yourpassword。
重启whsitle:
$ w2 restart
停止whistle:
$ w2 stop
调试模式启动whistle(主要用于查看whistle的异常及插件开发):
$ w2 run
启动完whistle后,最后一步需要配置代理。
4. 配置代理
配置信息
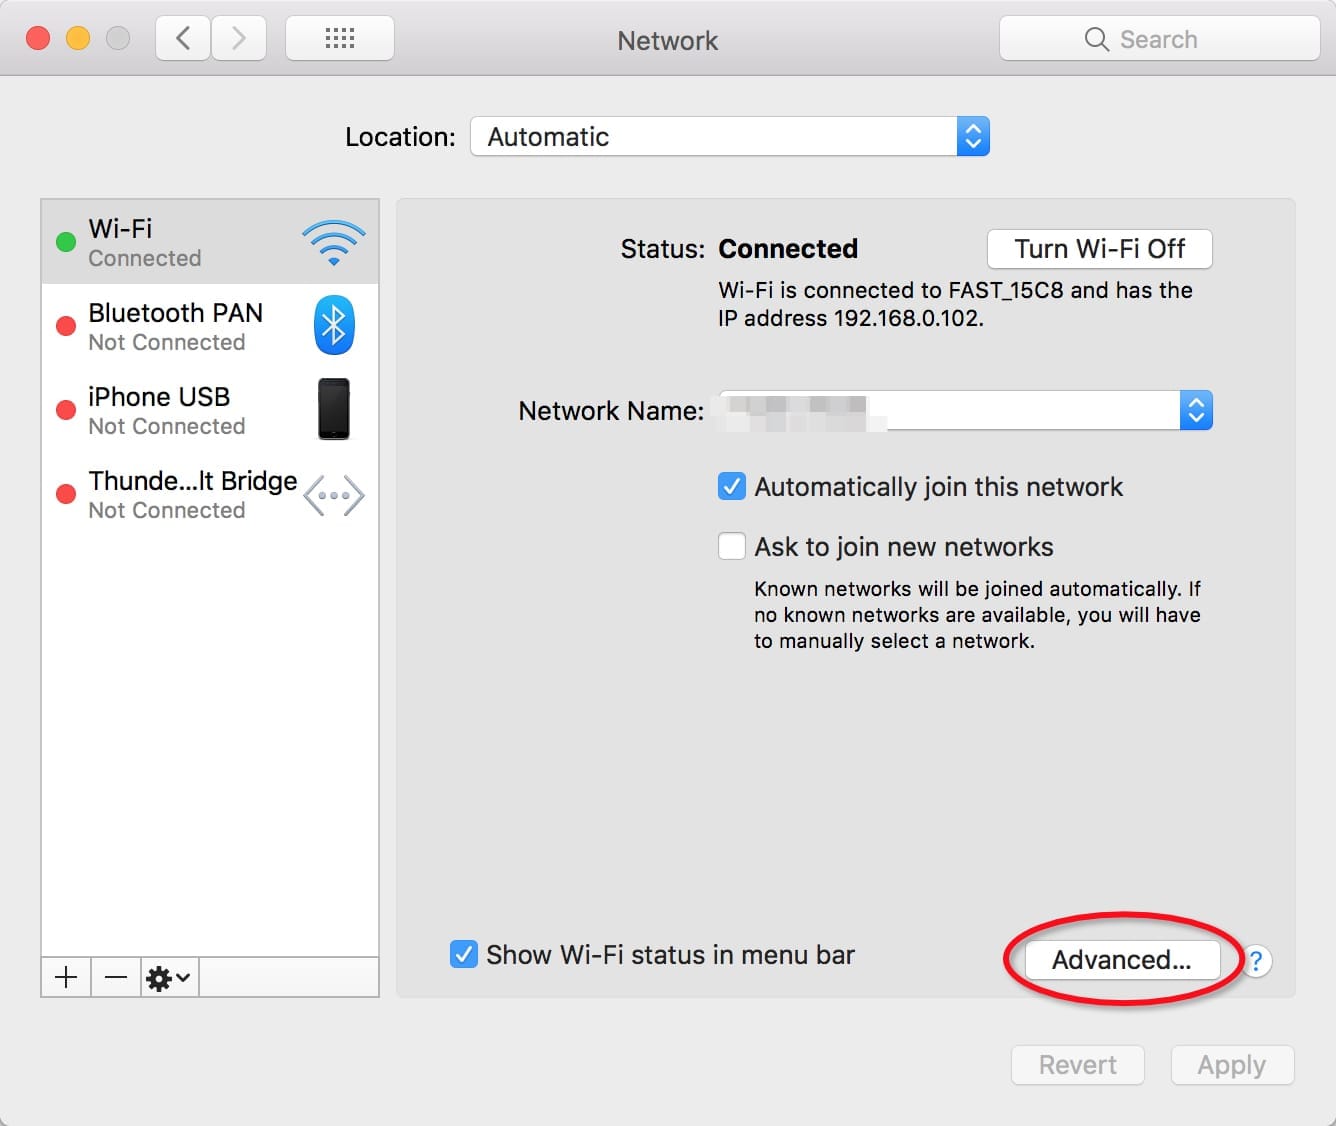
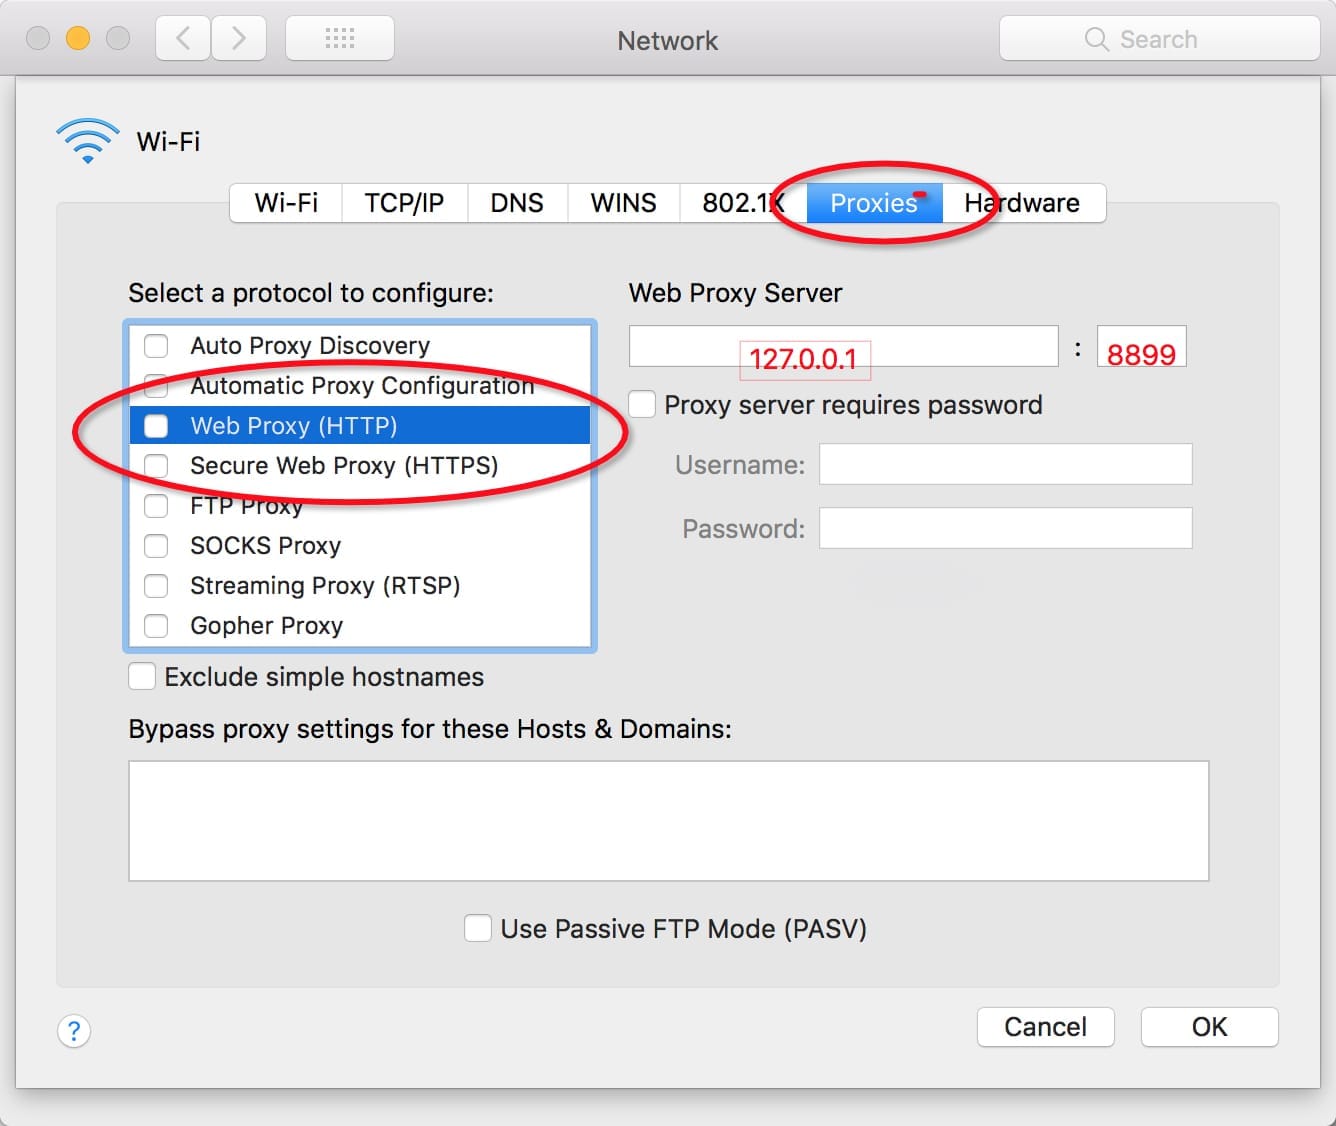
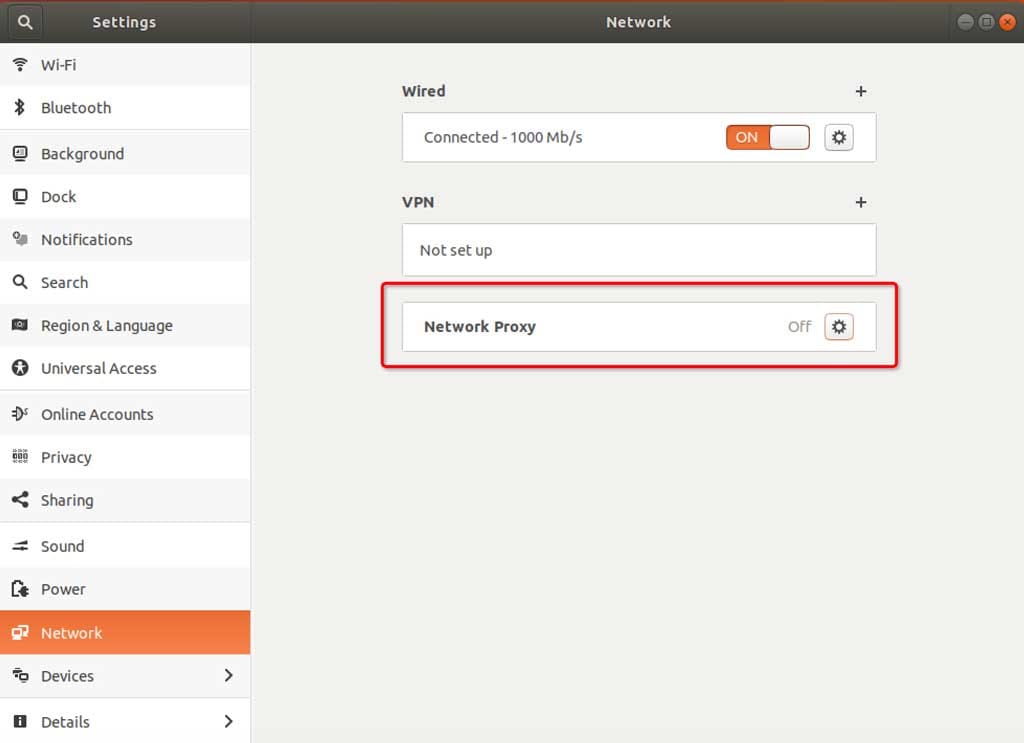
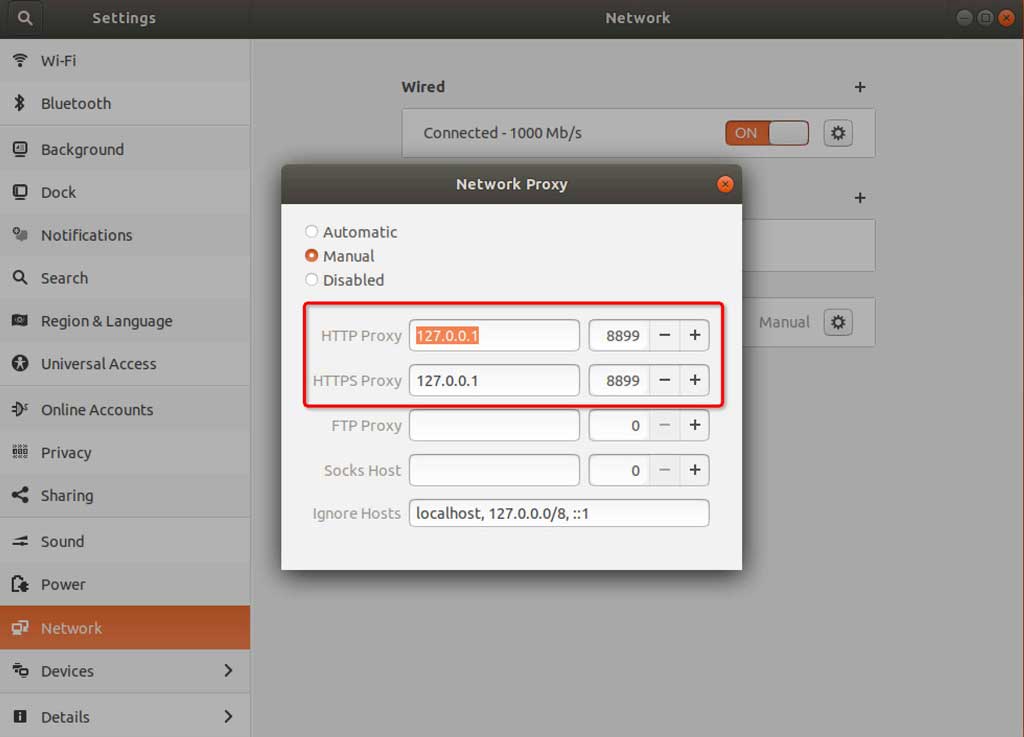
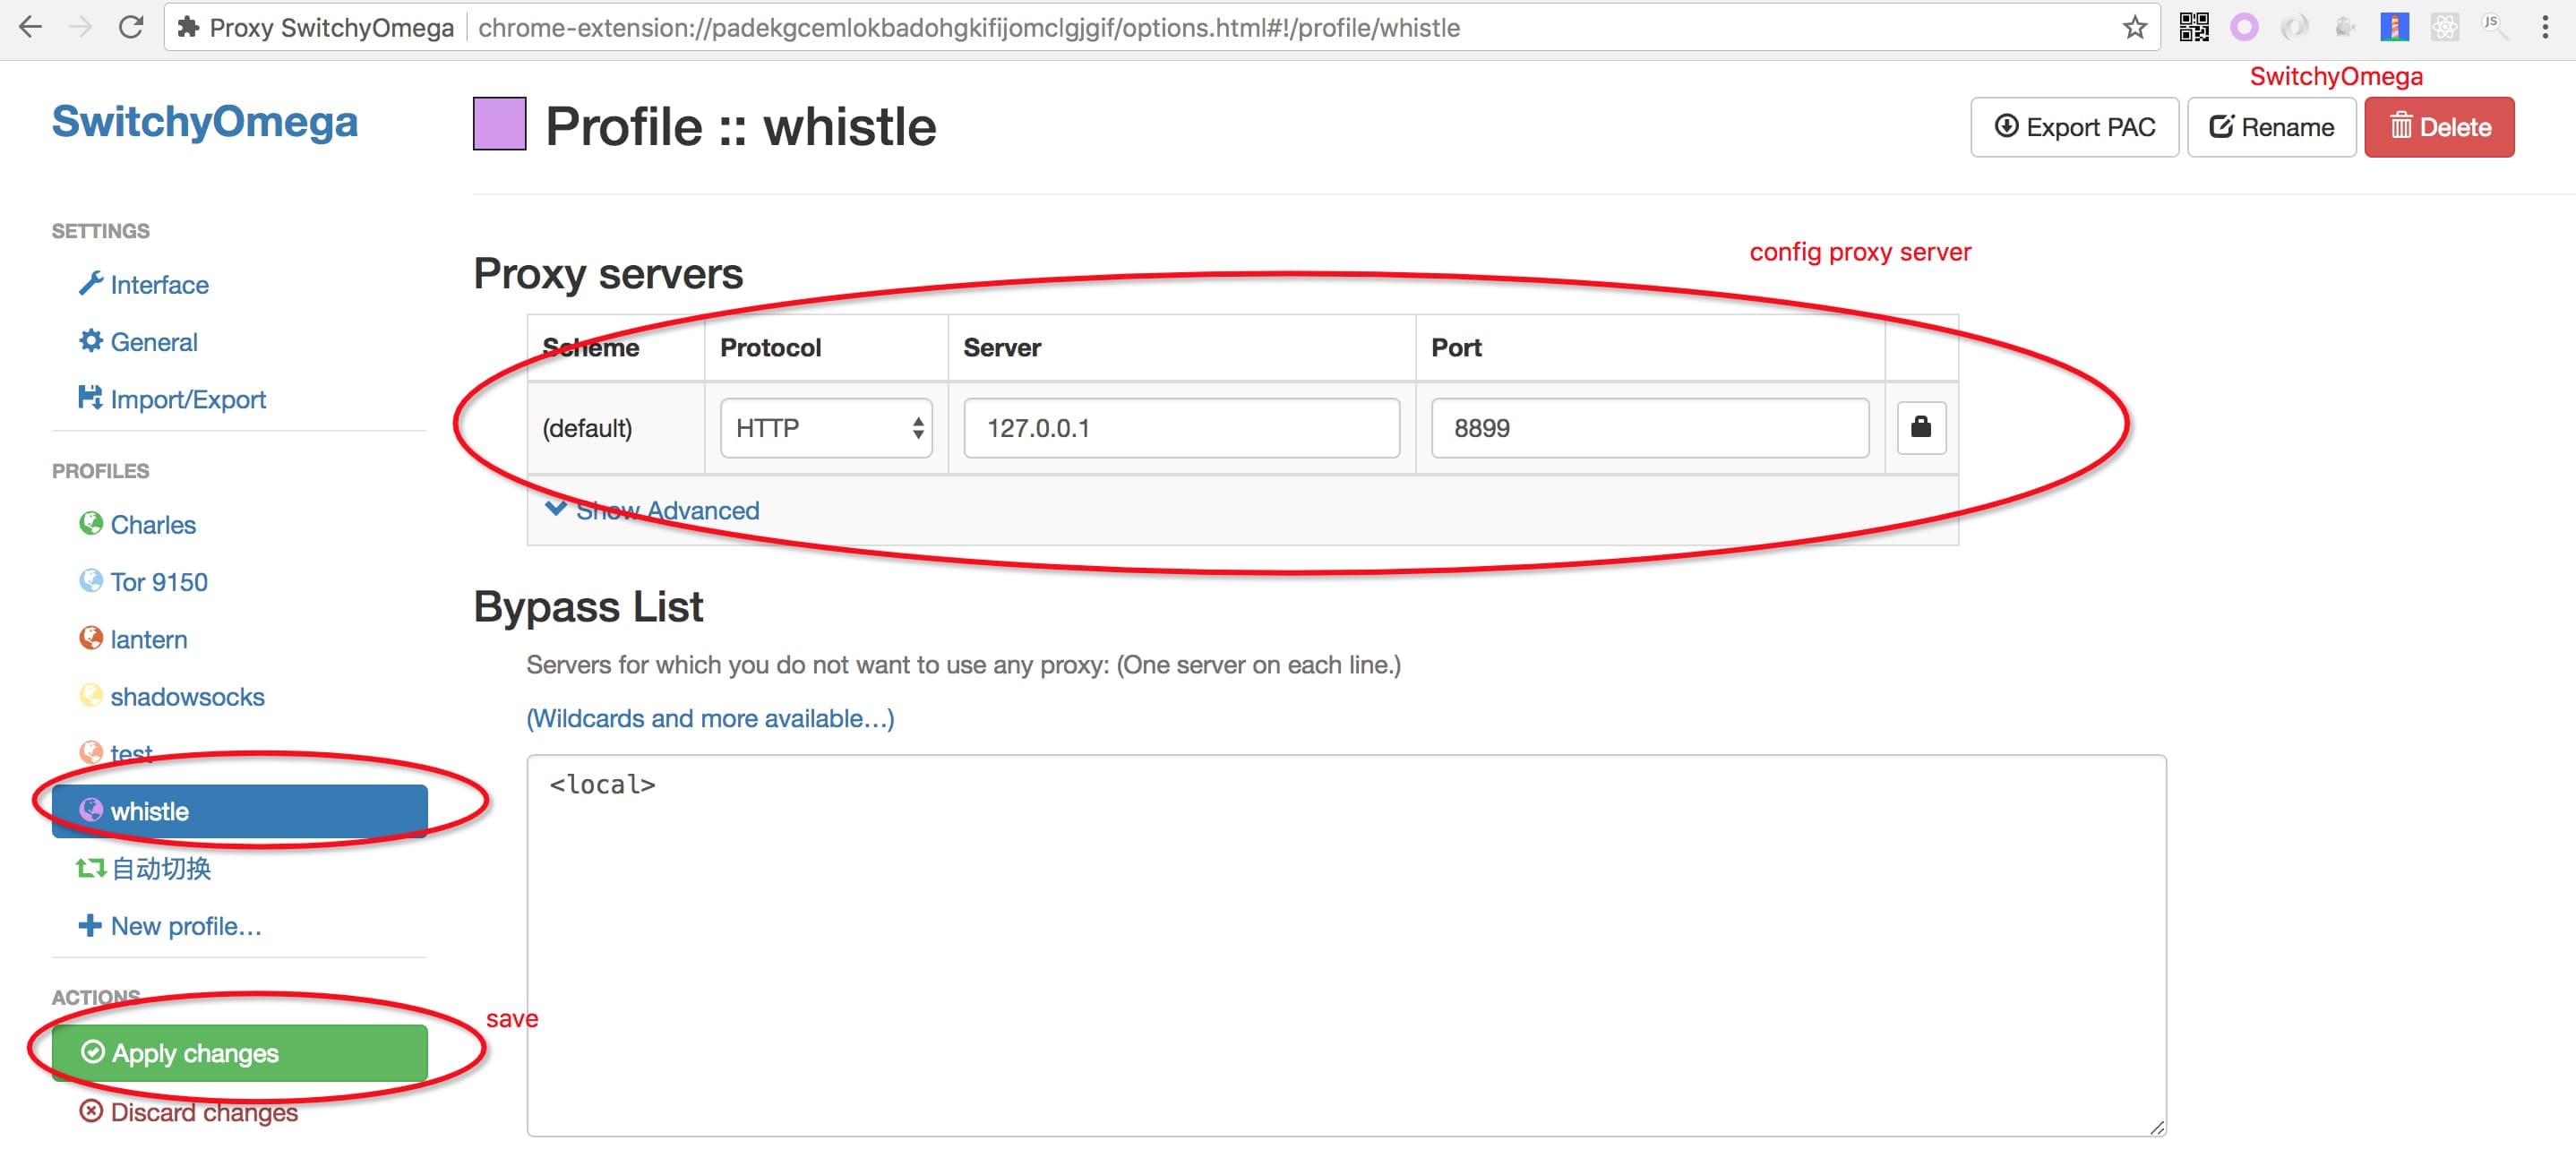
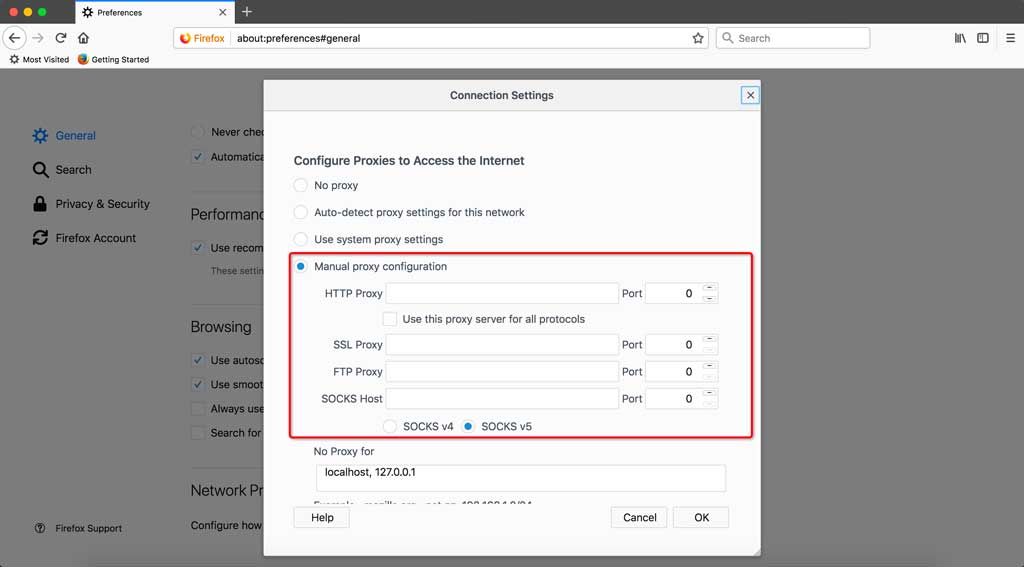
- 代理服务器:127.0.0.1 (如果部署在远程服务器或虚拟机上,改成对应服务器或虚拟机的ip即可)
- 默认端口:8899 (如果端口被占用,可以在启动是时通过
-p来指定新的端口,更多信息可以通过执行命令行w2 help(v0.7.0及以上版本也可以使用w2 help) 查看)
勾选上 对所有协议均使用相同的代理服务器
代理配置方式(把上面配置信息配置上即可)
全局代理:直接配置系统代理:
- Windows
- Mac: System Preferences > Network > Advanced > Proxies > HTTP or HTTPS
Linux: Settings > Network > VPN > Network Proxy > Manual
浏览器代理:安装浏览器代理插件 (推荐)
安装Chrome代理插件:推荐安装SwitchyOmega
Firefox: 地址栏输入访问
about:preferences,找到Network Proxy,选择手动代理配置(Manual proxy configuration),输入代理服务器地址、端口,保存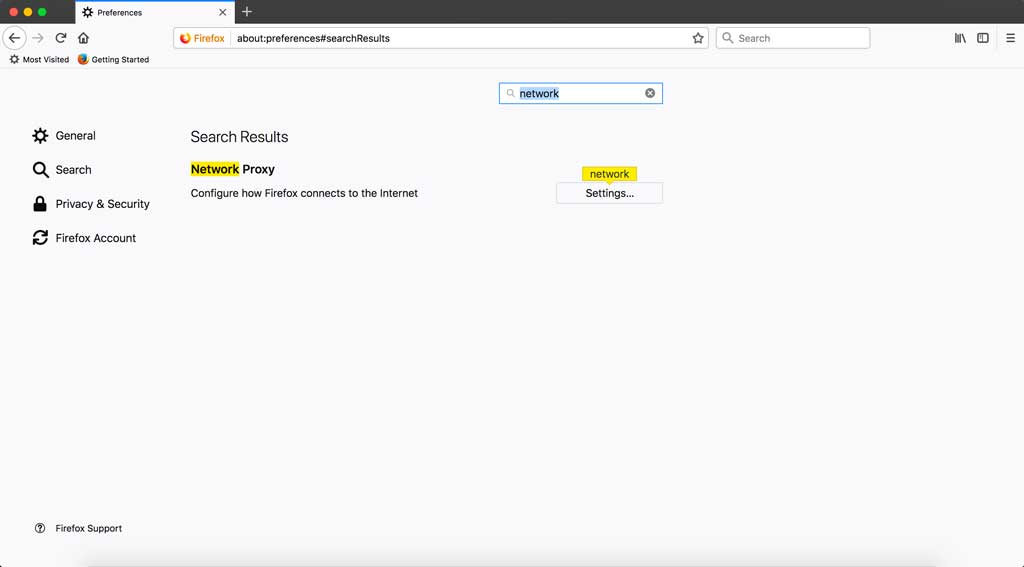
移动端需要在
设置中配置当前Wi-Fi的代理,以 iOS 为例: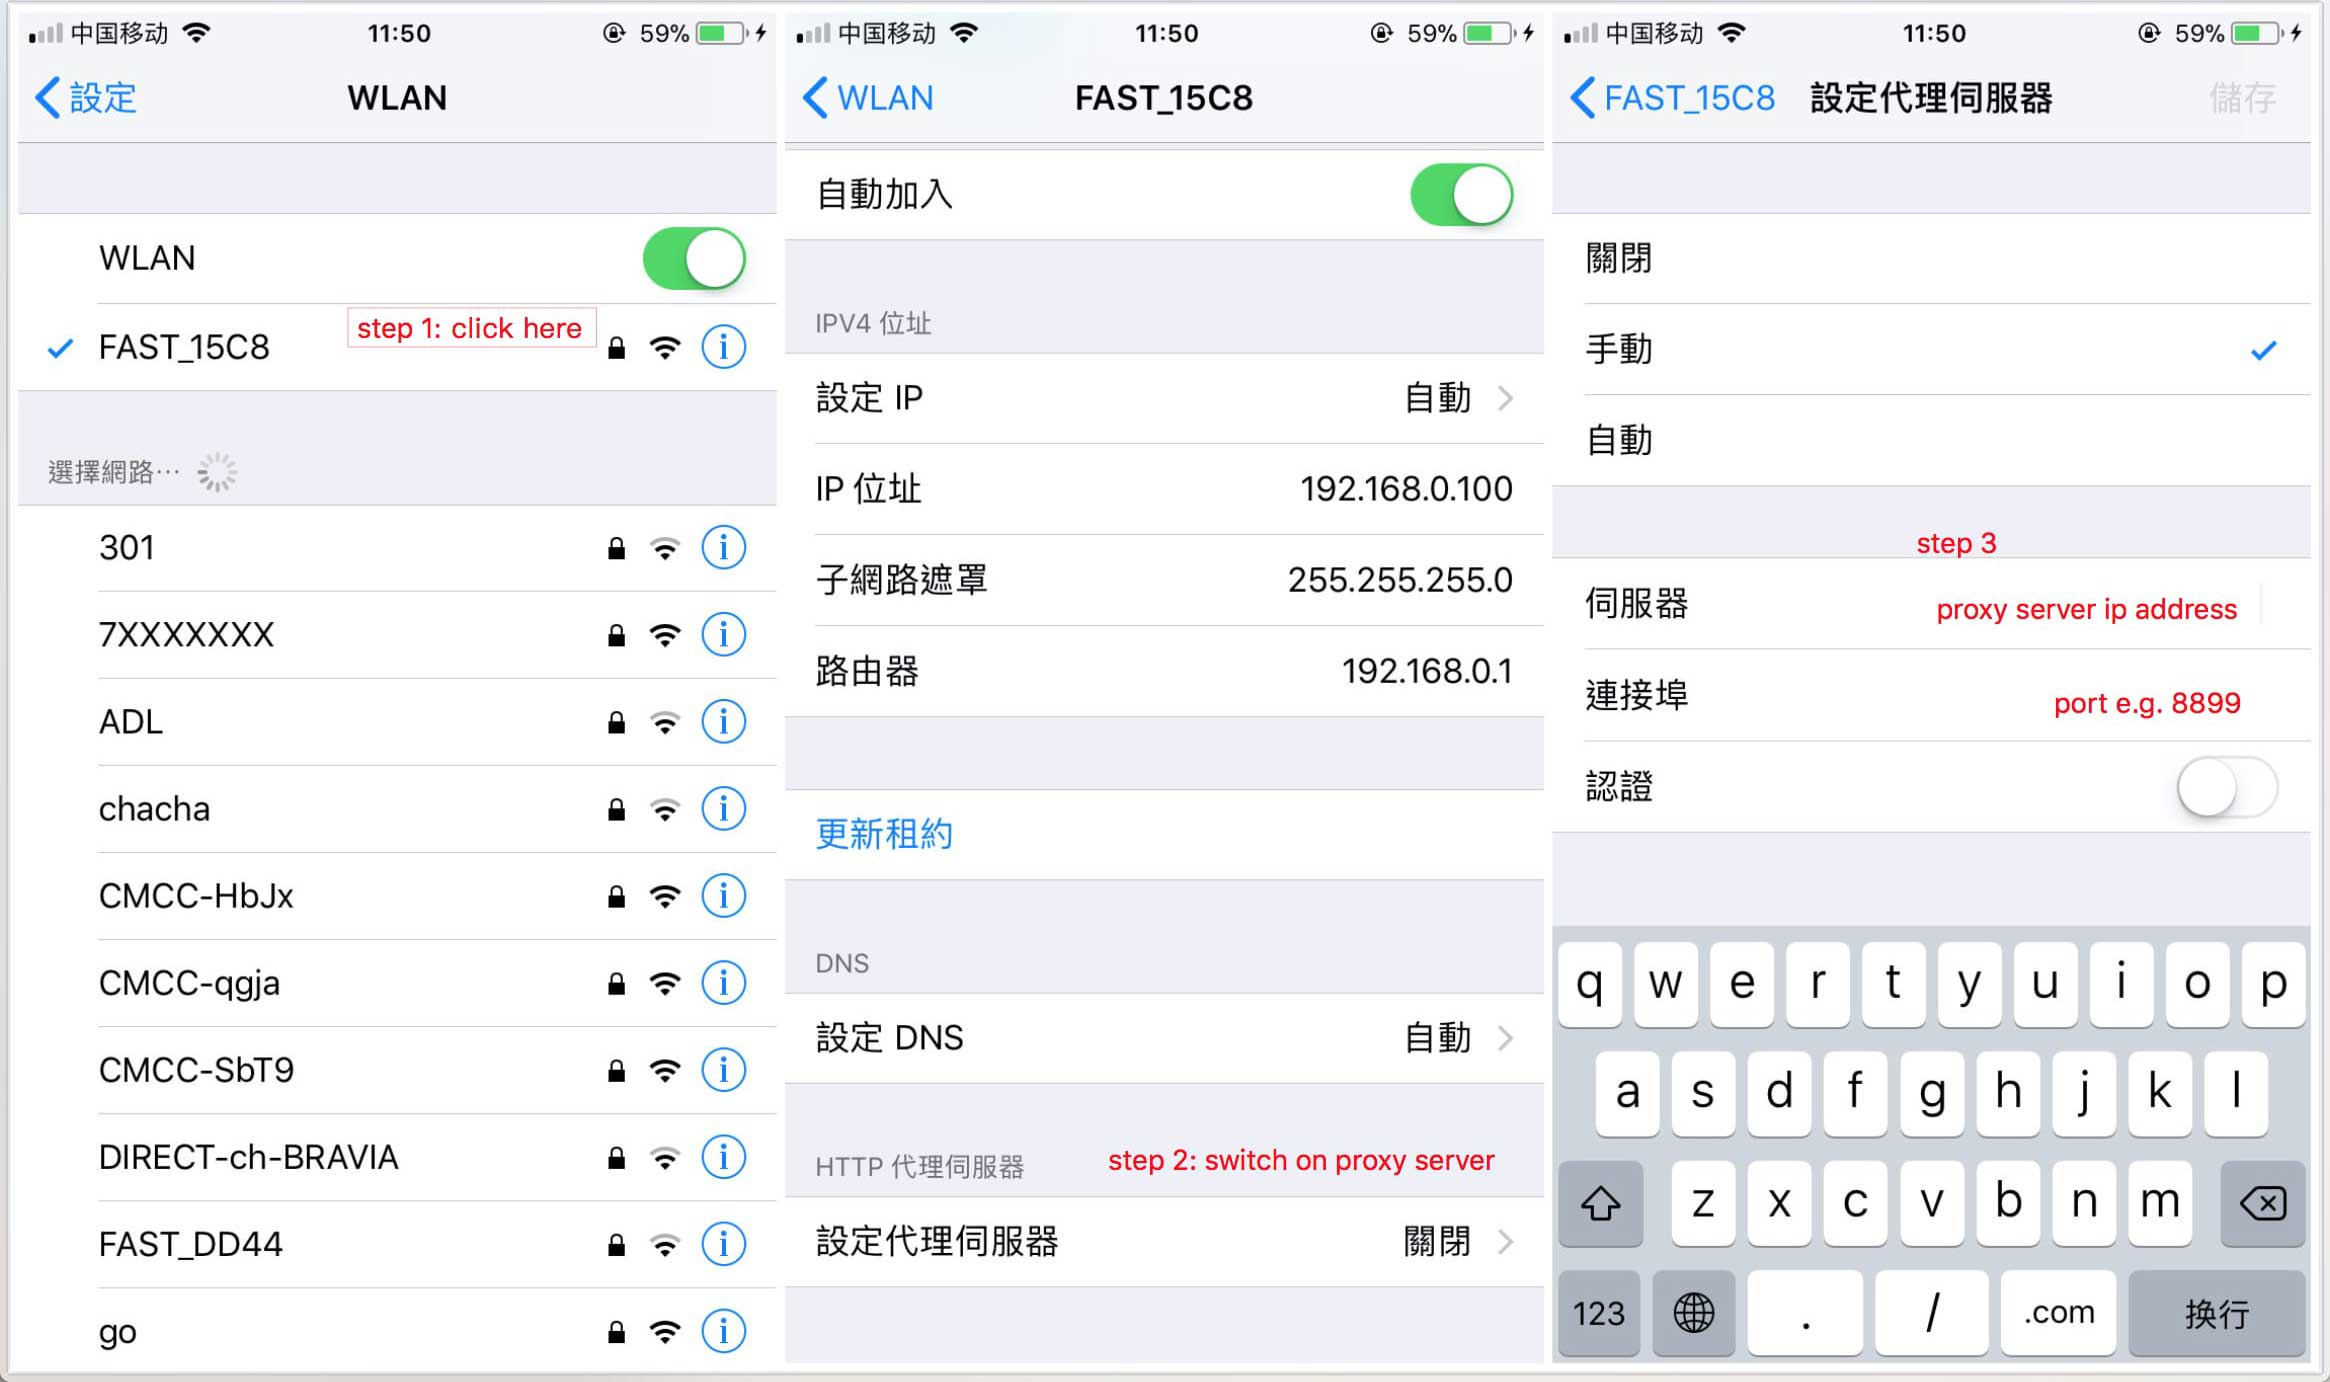
PS: 如果配置完代理,手机无法访问,可能是whistle所在的电脑防火墙限制了远程访问whistle的端口,关闭防火墙或者设置白名单:http://jingyan.baidu.com/article/870c6fc317cae7b03ee4be48.html
访问配置页面
启动whistle及配置完代理后,用Chrome浏览器(由于css兼容性问题界面只支持Chrome浏览器)访问配置页面,如果能正常打开页面,whistle安装启动完毕,可以开始使用。
可以通过以下两种方式来访问配置页面:
- 方式1:域名访问 http://local.whistlejs.com/
- 方式2:通过ip+端口来访问,形式如
http://whistleServerIP:whistlePort/e.g. http://127.0.0.1:8899 - 方式2:通过命令行参数
-P xxxx自定义webui的端口(xxxx表示要设置的端口号),自定义端口支持上述两种方式访问,也支持 http://127.0.0.1:xxxx
