 我的书签
我的书签
 添加书签
添加书签 移除书签
移除书签- 如何针对 Node 运行时引入第三方包
- 引用 Lodash 第三方包
- 引用 Lodash 第三方包
如何针对 Node 运行时引入第三方包
声明:
- 本文测试所用设备系统为 Ubuntu18.04
- 运行模式为 docker 容器模式,native 进程模式配置流程相同
- Node 版本为 8.5
- 模拟 MQTT client 行为的客户端为 MQTTBox
- 本文选择引入
Lodash这个第三方包来进行演示说明 - 本文中基于 Hub 模块创建的服务名称为
localhub服务。并且针对本文的测试案例中,对应的localhub服务、函数计算服务以及其他服务的配置统一如下:
- # localhub 配置
- # 配置文件位置: var/db/baetyl/localhub-conf/service.yml
- listen:
- - tcp://0.0.0.0:1883
- principals:
- - username: 'test'
- password: 'hahaha'
- permissions:
- - action: 'pub'
- permit: ['#']
- - action: 'sub'
- permit: ['#']
- # 本地 baetyl-function-manager 配置
- # 配置文件位置: var/db/baetyl/function-manager-conf/service.yml
- hub:
- address: tcp://localhub:1883
- username: test
- password: hahaha
- rules:
- - clientid: localfunc-1
- subscribe:
- topic: node
- function:
- name: sayhi
- publish:
- topic: t/hi
- functions:
- - name: sayhi
- service: function-sayhi
- instance:
- min: 0
- max: 10
- idletime: 1m
- # application.yml配置
- # 配置文件位置: var/db/baetyl/application.yml
- version: v0
- services:
- - name: localhub
- image: hub.baidubce.com/baetyl/baetyl-hub
- replica: 1
- ports:
- - 1883:1883
- mounts:
- - name: localhub-conf
- path: etc/baetyl
- readonly: true
- - name: localhub-data
- path: var/db/baetyl/data
- - name: localhub-log
- path: var/log/baetyl
- - name: function-manager
- image: hub.baidubce.com/baetyl/baetyl-function-manager
- replica: 1
- mounts:
- - name: function-manager-conf
- path: etc/baetyl
- readonly: true
- - name: function-manager-log
- path: var/log/baetyl
- - name: function-sayhi
- image: hub.baidubce.com/baetyl/baetyl-function-node85
- replica: 0
- mounts:
- - name: function-sayjs-conf
- path: etc/baetyl
- readonly: true
- - name: function-sayjs-code
- path: var/db/baetyl/function-sayhi
- readonly: true
- volumes:
- # hub
- - name: localhub-conf
- path: var/db/baetyl/localhub-conf
- - name: localhub-data
- path: var/db/baetyl/localhub-data
- - name: localhub-log
- path: var/db/baetyl/localhub-log
- # function manager
- - name: function-manager-conf
- path: var/db/baetyl/function-manager-conf
- - name: function-manager-log
- path: var/db/baetyl/function-manager-log
- # function node runtime sayhi
- - name: function-sayjs-conf
- path: var/db/baetyl/function-sayjs-conf
- - name: function-sayjs-code
- path: var/db/baetyl/function-sayjs-code
系统自带的 Node 环境有可能不会满足我们的需要,实际使用往往需要引入第三方库,下面给出示例。
引用 Lodash 第三方包
Lodash 是一个一致性、模块化、高性能的 JavaScript 实用工具库。我们可以引入第三方库 Lodash 来使用它的功能。如何引入,具体如下所示:
- 步骤 1: 进入 js 脚本目录,然后下载
Lodash
- cd /directory/of/Node/script
- npm install --save lodash
- 步骤 2: 在具体执行脚本中引入第三方库
Lodash,如下所示:
- const _ = require('lodash');
- 步骤 3: 执行脚本
- node your_script.js
如上述操作正常,则形成的脚本目录结构如下图所示。
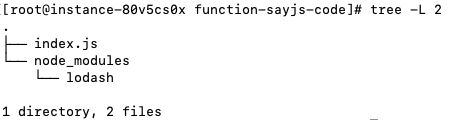 Node Lodash 第三方库脚本目录
下面,我们编写脚本 index.js 来使用 Lodash 提供的功能,具体如下:
- #!/usr/bin/env node
- const _ = require('lodash');
- exports.handler = (event, context, callback) => {
- result = {}
- //筛选数组中重复元素
- result["unique_array"] = _.uniq(event['array']);
- //排序
- result['sorted_users'] = _.sortBy(event['users'], function(o) { return o.age; });
- //过滤
- result['filtered_users'] = _.filter(event['users'], function(o) { return !o.active; });
- callback(null, result);
- }
函数运行时服务的配置如下:
- # node function 配置
- functions:
- - name: 'sayhi'
- handler: 'index.handler'
- codedir: 'var/db/baetyl/function-sayhi'
首先定义如下的 json 数据作为输入消息:
- {
- "array": ["Jane", 1, "Jane", 1, 2],
- "users": [
- { "user": "barney", "age": 36, "active": true },
- { "user": "fred", "age": 40, "active": false },
- { "user": "Jane", "age": 32, "active": true }
- ]
- }
如上,localhub 服务接收到发送到主题 node 的消息后,会调用 index.js 脚本执行具体逻辑,对消息中的数组执行重复元素筛选、元素排序、元素按条件过滤等操作。然后将执行结果以 MQTT 消息形式反馈给主题 t/hi。我们通过 MQTTBox 订阅主题 t/hi,可以观察到如下消息:
- {
- "unique_array": ["Jane", 1, 2],
- "sorted_users": [
- { "user": "Jane", "age": 32, "active": true },
- { 'user': 'barney', "age": 36, "active": true },
- { "user": "fred", "age": 40, "active": false }
- ],
- "filtered_users": [
- { "user": "fred", "age": 40, "active": false }
- ],
- }
 lodash数据处理
